


chinese dumplings and potstickers
 Recipe: chinese dumplings and potstickers
[warning: a long post]
Do you know what that one recipe was that started you on your cooking passion? I have cooked since I was a kid, but I didn’t get serious until I was a sophomore in college and I felt this cultural obligation to make dumplings from scratch to celebrate the Chinese New Year. Dumplings have lodged themselves in my head as my link to Chinese cooking and culture, but even better than that – mastering dumplings gave me the confidence to go forward and try other recipes and techniques.
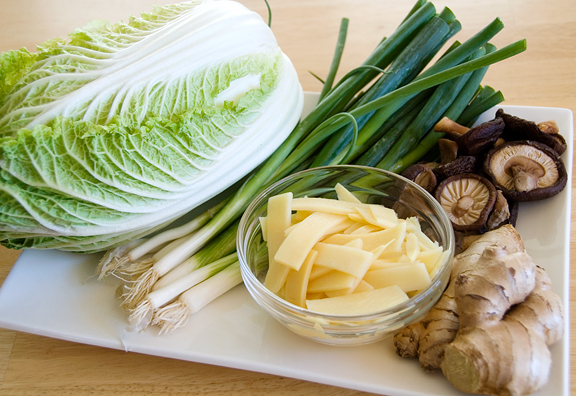
for the pork filling
I posted Making Chinese Dumplings with Jen on my website several years ago (it now lives here). People have written asking about fillings, thanking me for my recipe, asking me to post more versions… The endeavor to make Chinese dumplings isn’t like pouring a can of soda – it’s quite involved and taking the photos adds considerably more time. Seeing as my days of free time may be near an end, I decided Making Chinese Dumplings with Jen could use an upgrade and an added variation. Besides, that old version was created in graduate school, a time of simultaneously happy and extremely bad, miserable, loathsome, angry, depressing, unhappy associations for me.
there is an ungodly amount of chopping involved
First off, the process for making the dumplings and the potstickers is the same until you actually cook them. You steam or boil the dumplings, you pan fry (mmmm, fry…) the potstickers. I ate enough dumplings in my childhood that I feel I need to make up for it with potstickers now. That’s not true – I’m a sucker for fried things. I generally make true dumplings on Chinese New Year because Mom and Grandma have scared me into thinking I’ll be poor if I don’t. Something about eating dumplings means money, tofu is luck, something else is health, and the list goes on. I play it safe and eat everything.
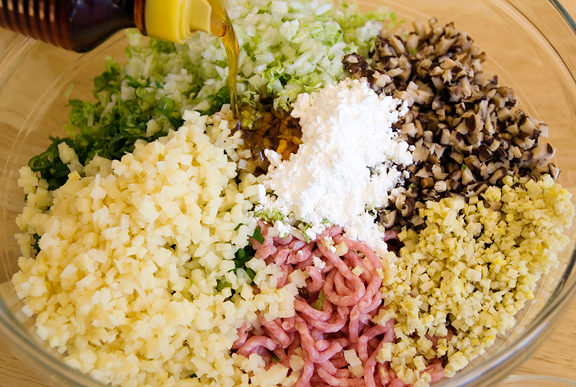
adding some sesame oil, soy sauce, and cornstarch to the mix
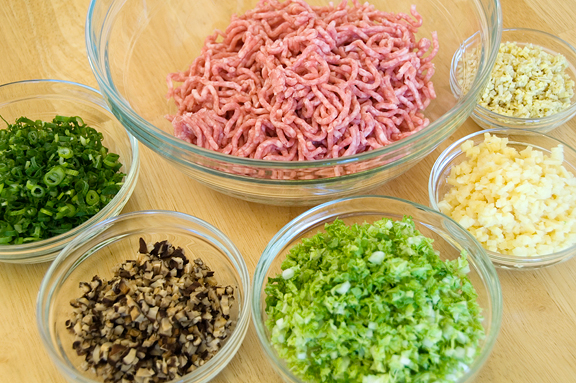
The biggest time sink in making dumplings (for me, anyway) is chopping everything into a mince. I don’t doubt people have tried and will continue to try using a food processor. I’ve done that before and I think it leads to inferior texture in your filling. A food processor is great at creating a purée or unevenly chopped pieces – but neither of those is what we want. Use a good, sharp knife and give yourself plenty of time.
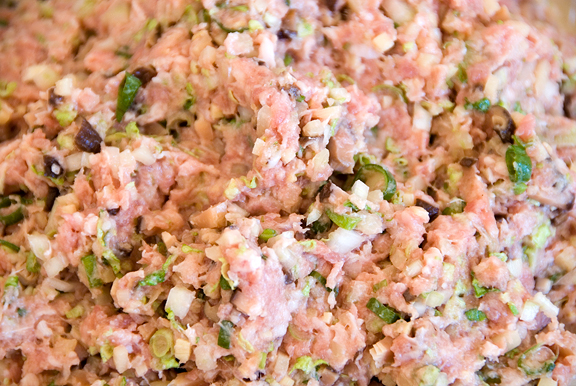
pork filling is ready
I used to have dumplings every Sunday night as a kid – and without all the work! Mom, Dad, and Grandma whipped them up in an hour or two. It’s quite the production with the three master chefs going (all three are AMAZING cooks). Alas, I am so OCD that I don’t allow my two housemates to help me (Jeremy gets dish duty and no one wants Kaweah to help) and it takes about 3 hours to produce 100 dumplings if I’m not shooting the process. Anyway, the big treat was when my mom would make shrimp dumplings. They were so good. I tried to make some once without consulting her on the ingredients. Cocky me, I thought it was so simple to figure out. They burned and tasted not quite right. I called her while I examined the potsticker with disappointment. “You need to add pork!” Oh, I didn’t know you added pork meat. “You need to add at least as much pork as the shrimp – or more. Or else there isn’t enough fat and it won’t taste as good and will burn.” Mom to the rescue. I suppose if you steam or boil, then you don’t need to use pork – but Mom is right that the pork adds flavor (via fat) that the shrimp can’t do on its own.
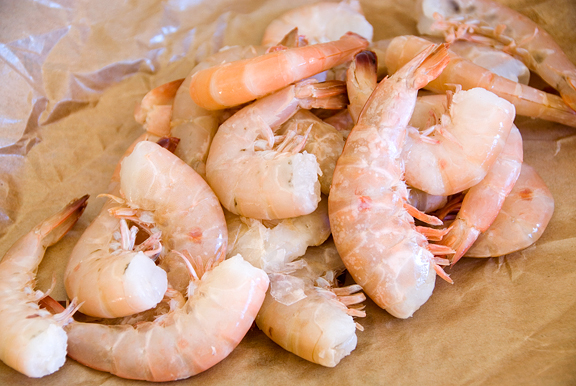
shrimp dumplings require… shrimp!
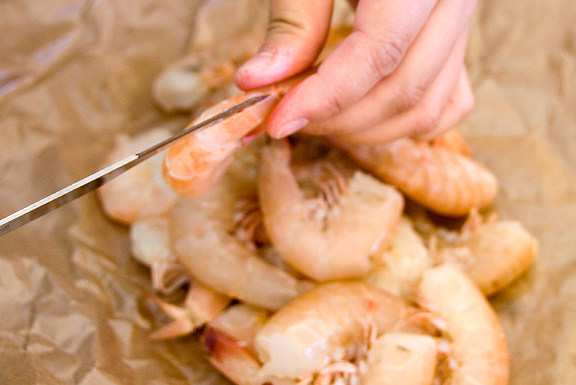
peel and devein
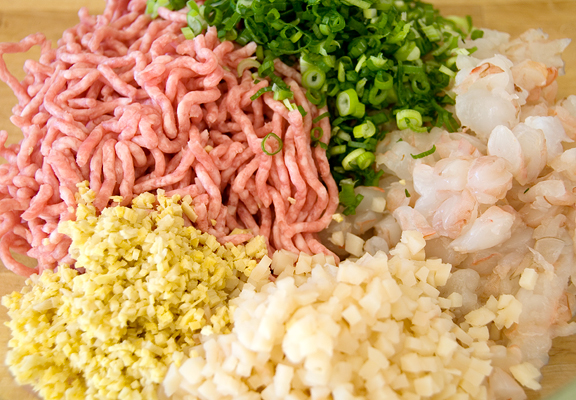
in the mix: ground pork, green onions, shrimp, water chestnuts, ginger root
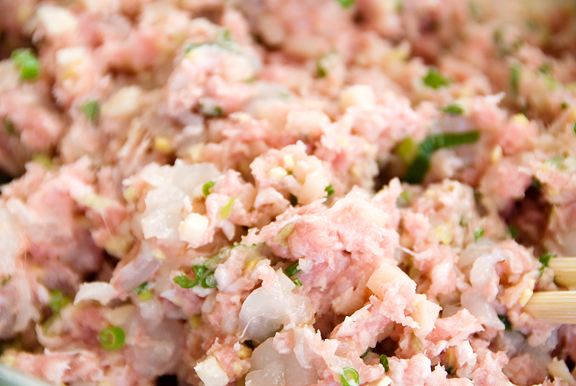
the shrimp filling
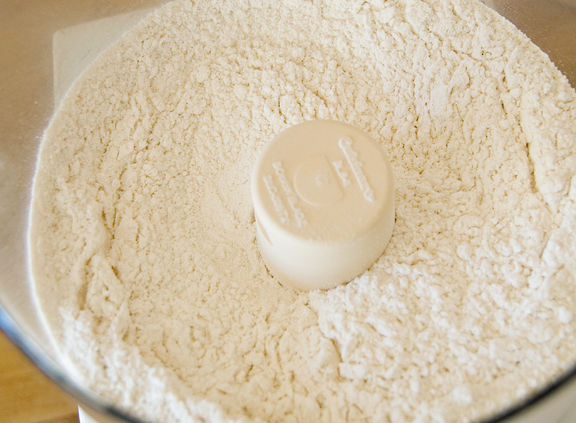
The dough is something I’ve cheated on. I use my Cuisinart with dough blade to mix the dough. My mom’s method is probably more authentic and consistent, but I suck at it. She mixes the flour and water with chopsticks. I know some people use wonton wrappers, but those have egg in the dough and they obviously aren’t as good as fresh homemade. I don’t use them, but I could see where making the dumpling skins could be daunting. I’m hoping my instructions will inspire others to make their own dough.
2 cups of flour for 1/2 pound of meat in the filling
pour in about 1/2 cup of water and pulse
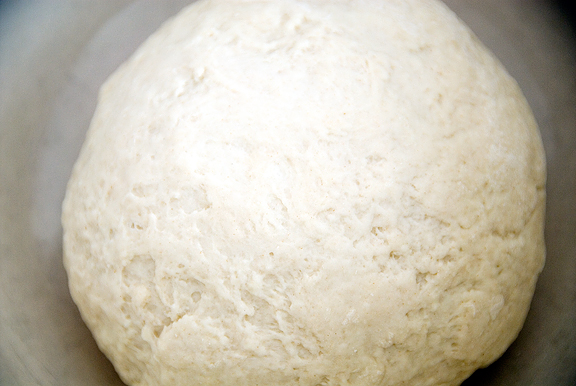
the dough should be firm and silky to touch
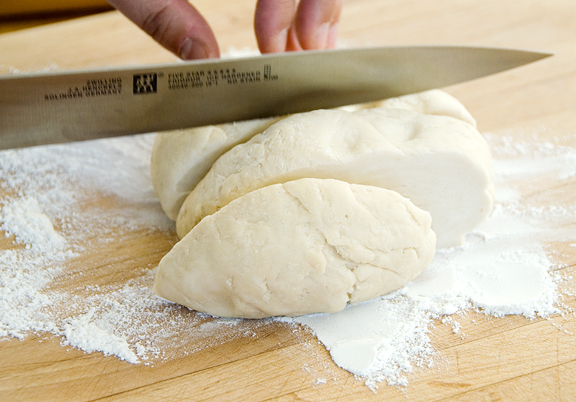
To make the dough discs, I slice the lump into 4 strips and roll each strip into an even cylinder about 1 1/4 inches in diameter. I slice the strip into pieces about 3/4 inch thick, rotating the strip by 90 degrees after each slice. Then I press each slice into a circular disc. The more circular you can get the disc, the easier time you’ll have of rolling it out. I have to work quickly in Colorado because our air is generally so dry (today we are at 10% humidity) that the dough begins to harden and crack at the surface. I tend to cut a dozen and put the remaining dough under a damp kitchen towel while I work.
cutting strips
cutting slices
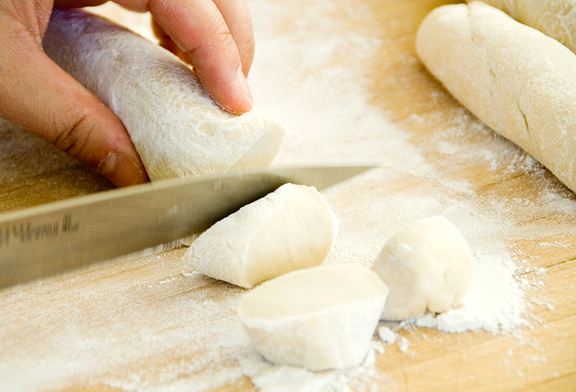
pressing discs
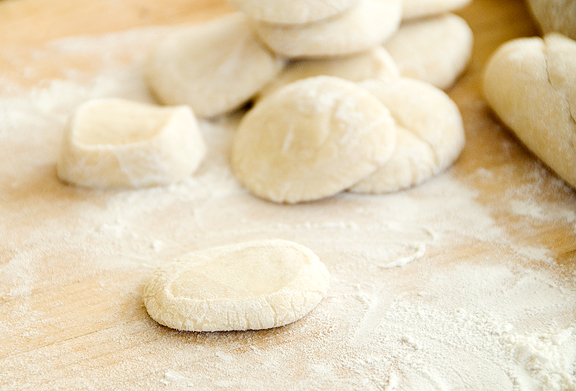
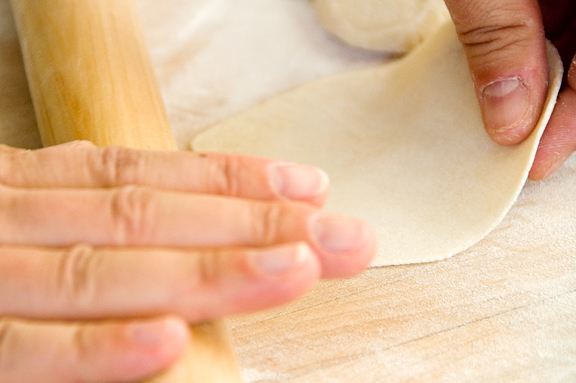
Once I have a flat, round disc of dough, I like to roll it out once to less than 1/4 inch thickness and then turn it 90 degrees and roll it out once to maintain the circular shape. The next step is where some fingers may get pinched, but with practice it goes very quickly. Pick up the the edge of the dough in one hand, and with the other hand, roll the rolling pin on the edge nearest to you, but not past the middle. Thin out the dough with a couple of rolls and then turn the disc 60 degrees and repeat until you’ve rolled out the whole thing to a larger and thinner circle. You want to leave the middle just slightly fatter than the edges. The disc should be between 3 and 4 inches in diameter.
roll it out the first time
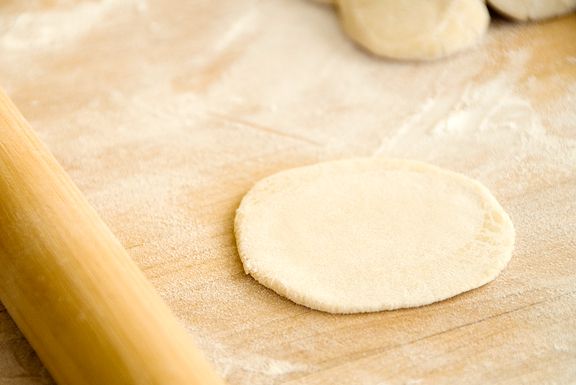
rolling the final skin
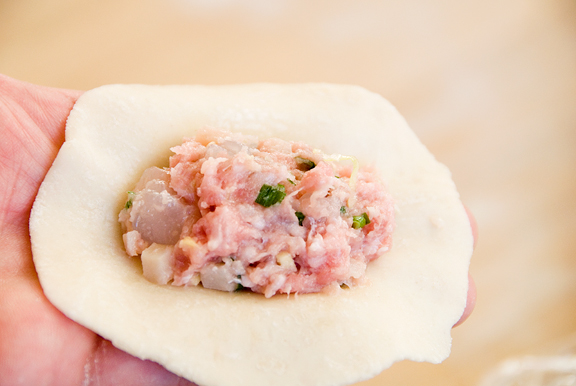
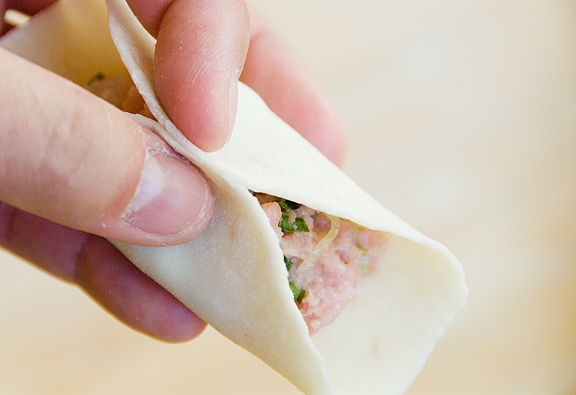
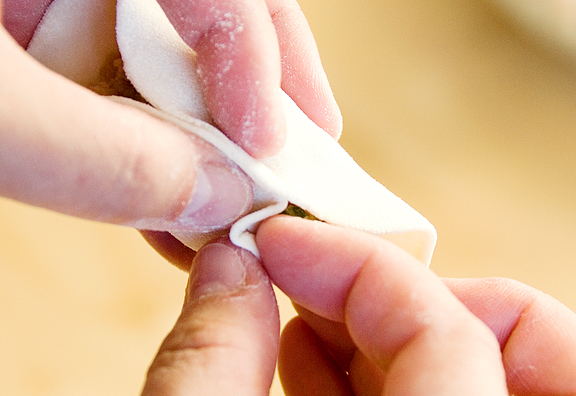
The shape of your dumpling skin will determine how easily you can fold your dumplings and probably how pretty they turn out. I’ve taught several white people how to fold dumplings in person and some of them don’t quite make that connection between the dumpling skin that resembles the map-view of Italy and the dumpling that looks like that scene from Alien when the little critter bursts forth from Kane’s chest… yeah. Well, assuming you have a circular wrapper you plop enough filling in the center and allow about 1/2 inch of margin. Take your chopsticks (that’s what I use to handle the filling) and shape it into an oval on the dough. Fold the two ends of dough on the short axis of the filling together like a taco and pinch them tight at the top. From there, move about 1/4 of the way down from center and create a fold in the edge of the dough closest to you, fold it down and pinch it tight. You’re creating a pleat in the dough. Repeat this two or three more times – enough to leave a teardrop opening at the end.
it takes some practice to know not to over or under fill
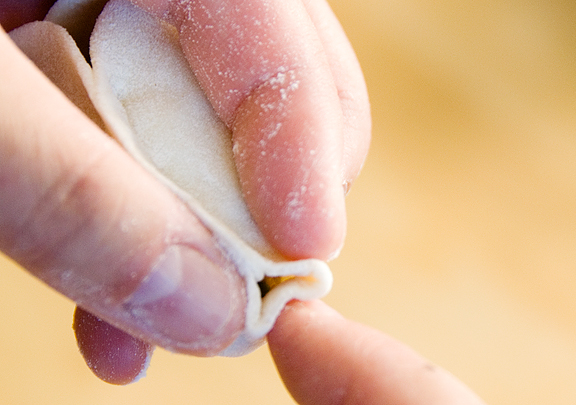
pinch the top together
making a pleat
the teardrop at the end
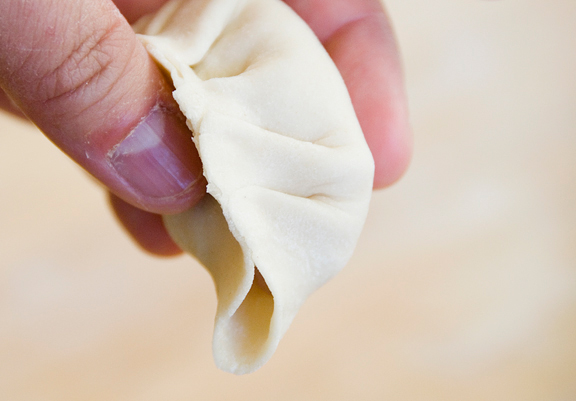
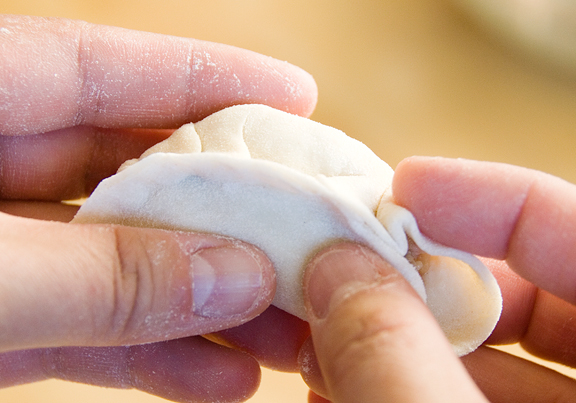
I like to poke the end of the teardrop in and then pinch it shut. Now half of the dumpling is folded. Turn the dumpling around so the pleats are facing away from you and pleat toward the center on the same side as the pleats you just made. The whole thing should curve into a crescent form concave toward you. After the pleats are done and the other corner is pinched in, I go over the entire crest and pinch it tight because any openings will result in filling leaking out or other unsightly issues. The final dumpling should be a neat and pretty package.
closing the end
pleating the other side
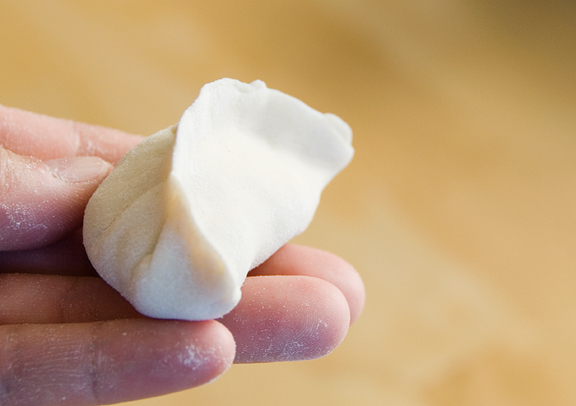
the dumpling should resemble something like this
Making a hundred dumplings isn’t easy on the back. There is no way I can work the dough on my kitchen counters – they are too high. I work on my kitchen table because the height allows me to use my weight when rolling out the dough. Don’t forget to take a break and give your body a stretch. Let’s have a look at our faithful companion… She’s never far from the action in the kitchen.
good dog

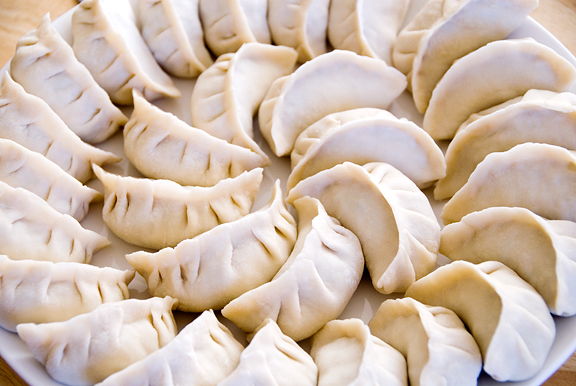
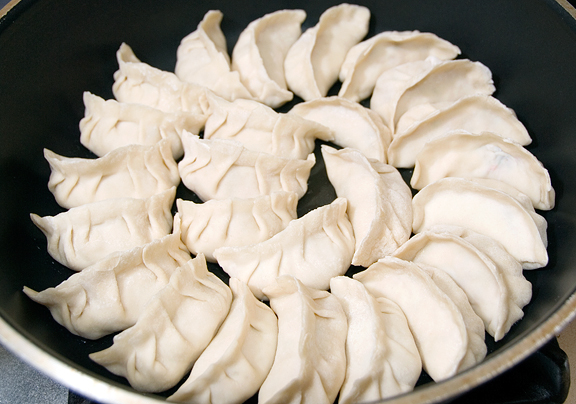
I like to line my dumplings neatly on a large plate. I can typically fit all of the dumplings on a plate in one batch to cook in my large frying pan. Before I place a finished dumpling on the plate, I gently rub the base of the dumpling in a thin layer of flour on the work surface. It helps to prevent sticking to the plate (which can destroy a dumpling) when you need to quickly set them in the frying pan.
like little purses

a plateful ready for cooking
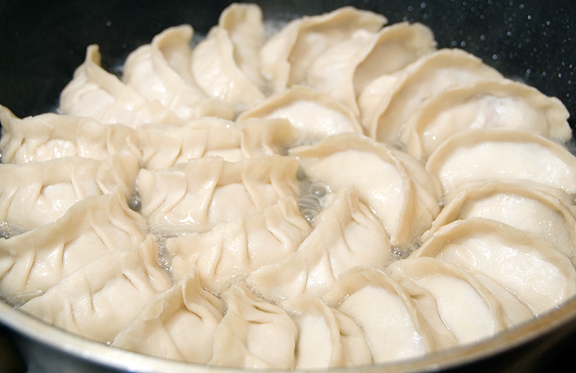
Frying potstickers is the more complex of the different ways to prepare dumplings. It’s quite simple though. I use a large non-stick frying pan with high sides and cover. First you pan fry the dumplings in a little bit of oil (a few tbsps) on medium high heat. When the bottoms get golden, ready yourself with the lid and in one swift move pour water into the pan (duck while everything spatters violently) and clap the lid on! I’ve made several messes over the years during this step. A measuring cup with a spout helps a lot and you have to dump the water in ALL AT ONCE. When the water boils off, remove the lid and reduce the heat to medium or medium low. This allows the potstickers to dry out and crisp up.
getting settled into the pan
bubbling hot after adding the water
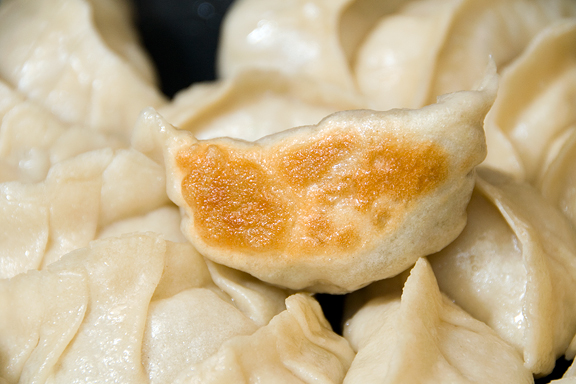
shoot for a golden bottom
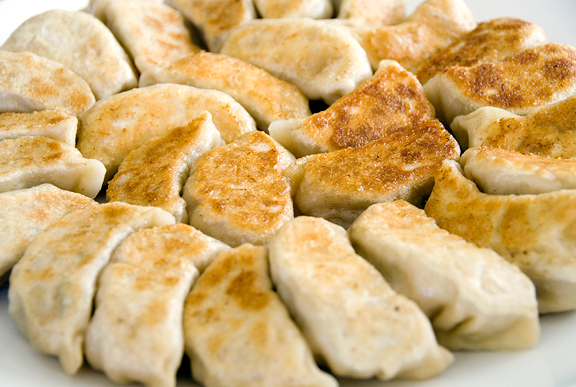
When the dumplings are done, you can scoop them out and serve them hot, or you can do a fancy move and flip them onto a plate upside down. The second trick doesn’t always feel like it will work for me. The pan is heavy and still very hot. I always worry that my plate is going to go flying and shatter on the floor amidst fallen potstickers that the dog would immediately dive into… But it seems to work alright and sometimes I don’t even have to rearrange them to look like they came out of the pan correctly.
serve bottoms up
Dipping sauces are a personal choice. I like to use soy sauce, a dash of sesame oil, red wine vinegar or black vinegar, and most of all a spicy chili garlic paste. You can add minced ginger, garlic, green onions, sugar, take your pick – or pick them all. If you don’t plan on eating all of the dumplings (I usually make a triple batch) you can successfully freeze them for a later date. Don’t cook them, but place them on a baking sheet so none of them are touching. Pop the sheet into the freezer for 20 to 30 minutes until the dumplings are no longer sticky or soft. Place the frozen dumplings in a freezer bag taking care not to squash them together and seal. Freeze for up to a couple of months. Cook the same way, although you may way to let them cook a little longer during the boiling water phase to ensure the filling is thoroughly cooked. Easy peasy, right?
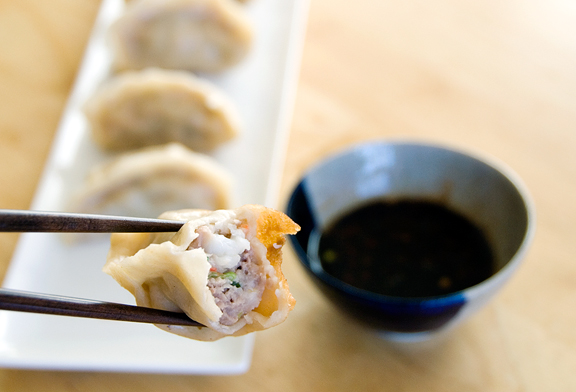
shrimp potsticker
Chinese Dumplings/Potstickers
[print recipe]
pork filling
1 lb ground pork
4 large napa cabbage leaves, minced
3 stalks green onions, minced
7 shitake mushrooms, minced (if dried – rehydrated and rinsed carefully)
1/2 cup bamboo shoots, minced
1/4 cup ginger root, minced
3 tbsp soy sauce
2 tbsp sesame oil
2 tbsp corn starch
OR
shrimp filling
1/2 lb raw shrimp, peeled, deveined, and coarsely chopped
1/2 lb ground pork
3 stalks green onions, minced
1/4 cup ginger root, minced
1 cup water chestnuts, minced
1 tsp salt
3 tbsp sesame oil
2 tbsp corn starch
dough
Note: you will want to double this for the amount of filling listed – I just tend to use leftover pork filling for soup meatballs. A single batch will yield about 40 dumplings depending on size.
2 cups all-purpose flour
1/2 cup warm water
flour for worksurface
dipping sauce
2 parts soy sauce
1 part vinegar (red wine or black)
a few drops of sesame oil
chili garlic paste (optional)
minced ginger (optional)
minced garlic (optional)
minced green onion (optional)
sugar (optional)
Combine all filling ingredients in a large mixing bowl and mix thoroughly (I mix by clean hand). Cover and refrigerate until ready to use.
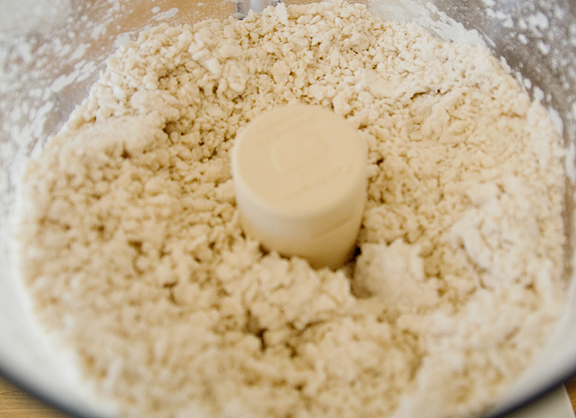
Make the dough, Method 1: Place the flour in the work bowl of a food processor with the dough blade. Run the processor and pour the warm water in until incorporated. Pour the contents into a sturdy bowl or onto a work surface and knead until uniform and smooth. The dough should be firm and silky to the touch and not sticky.[Note: it’s better to have a moist dough and have to incorporate more flour than to have a dry and pilling dough and have to incorporate more water).
Make the dough, Method 2 (my mom’s instructions): In a large bowl mix flour with 1/4 cup of water and stir until water is absorbed. Continue adding water one teaspoon at a time and mixing thoroughly until dough pulls away from sides of bowl. We want a firm dough that is barely sticky to the touch.
Both dough methods: Knead the dough about twenty strokes then cover with a damp towel for 15 minutes. Take the dough and form a flattened dome. Cut into strips about 1 1/2 to 2 inches wide. Shape the strips into rounded long cylinders. On a floured surface, cut the strips into 3/4 inch pieces. Press palm down on each piece to form a flat circle (you can shape the corners in with your fingers). With a rolling pin, roll out a circular wrapper from each flat disc. Take care not to roll out too thin or the dumplings will break during cooking. Leave the centers slightly thicker than the edges. Place a tablespoon of filling in the center of each wrapper and fold the dough in half, pleating the edges along one side (see images above).
To boil: Bring a large pot of water to a boil and add dumplings to pot. Boil the dumplings until they float.
To steam: Place dumplings on a single layer of napa cabbage leaves or on a well-greased surface and steam for about 6 minutes.
To pan fry (potstickers): Place dumplings in a frying pan with 2-3 tbsp of vegetable oil. Heat on high and fry for a few minutes until bottoms are golden. Add 1/2 cup water and cover. Cook until the water has boiled away and then uncover and reduce heat to medium or medium low. Let the dumplings cook for another 2 minutes then remove from heat and serve.
To freeze: Assemble dumplings on a baking sheet so they are not touching. Freeze for 20-30 minutes until dumplings are no longer soft. Place in ziploc bag and freeze for up to a couple of months. Prepare per the above instructions, but allow extra time to ensure the filling is thoroughly cooked.
To serve: Serve dumplings or potstickers hot with your choice of dipping sauce combinations.

October 4th, 2007 at 10:24 pm
Amazing! Thanks for the steps – for someone who has always wanted to make these but always been a little scared to – steps like these are really appreciated!
October 5th, 2007 at 3:14 am
Wow, what great step by steps. I have never made them before…but have eaten many.
I am too embarrassed to say that my first cooking inspiration was taking Ritz cracker and spread cheese ball on them and then covering them with tomato rice soup(I was young) but seemed to be obseesed with them for awhile…not so much now :)
October 5th, 2007 at 3:23 am
I love your photos! thanks for the detailed instructions on how to make potstickers! :)
October 5th, 2007 at 4:07 am
Oh they look fantastic! I’ll have to give them another go – mine didn’t look anything like yours!
October 5th, 2007 at 9:45 am
This is such a great post with step-by-step instructions. I have got to make these this weekend. Yum.
Thanks for sharing the recipe! Absolutely droolicious. ;)
October 5th, 2007 at 10:46 am
These look so great! I have never made dumplings before, mainly because I know I would have a hard time shaping them, and I’d probably make them look horrible! But I guess as long as they taste good, that’s what matters, right??
October 5th, 2007 at 12:45 pm
oh gosh, they look delicious!
on a completely unrelated note, what kind of camera do you have/use? i’m looking for a new one and your photos have such crisp color.
October 5th, 2007 at 1:02 pm
Julia – there are so many things that I wouldn’t know how to do today if it hadn’t been for someone showing me how! Glad I could pass that along :)
Peabody – it’s safe to say that we all had our moments as budding gourmets. I’ll share something that Jeremy would be mortified to know that I’m writing about… he used to (as a kid) nuke a piece of bologna until it curled up like a bowl, then he’d fill it with mayo and EAT IT. ugh… He’s not a gourmet though – just my taste tester. Can’t believe the guy is as thin as a rail.
Maninas – you are most welcome and thanks!
Nicisme – i’m sure yours will turn out beautifully. Good luck!
RM – woman, you flatter me! I drool right back at your site.
Deborah – i’ll bet that you would make great dumplings. the folding isn’t that hard – if you can handle pie crust, dumplings shouldn’t be too bad :)
Patti – thanks! You should read my about page for my tirade on photography, but the quick answer is that the crispness and color have to do with 1) focus and tripod and 2) knowing how to use lighting and post processing. My camera is a Nikon D200 which I use primarily for landscape photography. You could easily get by with a much more compact and inexpensive model for food photog.
October 5th, 2007 at 1:58 pm
These step-by-step pictures are gorgeous!
Having been dragged into the dumplings assembly line far too many times to count…there’s a cheat to making dumplings quickly. After placing the filling in the center, I place the wrapper and filling in my left palm (I’m right-handed) tuck in the edges a little, line the edges up, and press firmly. They’re not as pretty as yours are, but are functional, and hold the filling well.
October 6th, 2007 at 2:29 pm
My husband and I were just discussing that it’s almost that time of year to make dumplings. Thanks for a great refresher course, and I’m really looking forward to the shrimp/pork version! Great photos.
October 7th, 2007 at 9:37 pm
Ellen – Thanks for the tip! I never knew of any other way to fold dumplings than the way my mom and grandma taught me. That’s a good suggestion for beginners that I’ll keep in mind.
S’kat – thanks. I see you’re from the Hampton Roads area. I grew up there!
October 11th, 2007 at 9:53 am
[…] i’d far rather splurge on home-made pot stickers, or pumpkin cornbread cupcakes with maple cream cheese frosting (so good, it makes you wanna slap […]
October 16th, 2007 at 8:26 am
hi,
thanks for the receipes. i am giving it a go today. just a bit confused about the orignial and improved receipe.
Original Rec: Says to put a damp cloth over the dough for 15minutes, but the new one does not?
should i leave for 15minutes?
thanks again
October 16th, 2007 at 10:05 pm
Kristina – thanks for the question. I realize that my recipe was a tad vague. I’ll fix that now. Yes, cover with damp cloth and leave for 15 minutes. Hope they turn out for you!
November 5th, 2007 at 8:55 am
I made there dumplings this weekend and they are fantastic!! Thank you again for posting these wonderful recipes. I also made the candied orange peels. It was time consuming, but totally worth the wait. I am making an italian cookie called Roccoco( I hope I spelled that right) for the upcoming holidays, and it calls for candied citrus peel. I am so glad I can make my own!
Thanks!!
November 6th, 2007 at 12:36 pm
Amy – great! I’m so happy to hear that the recipe was clear enough for you to make the dumplings. It is great to know that you didn’t have any problems when giving them a try. If you do run into problems, certainly let me know because I always want to update any recipes that might be unclear. Thanks for the feedback :)
December 11th, 2007 at 8:05 am
Jen, these duplings look wonderful! Next time we make them we will definately have to try the home made dough and the pork filling too! Thanks for the tips! Alex
December 11th, 2007 at 6:04 pm
Alex – thanks so much. I have to admit that this technique takes some time and effort, but definitely worth it in the end. So it’s a good thing to do with a bunch of friends :)
December 13th, 2007 at 3:23 pm
This post is fantastic. Your instructions (especially the folding part) are detailed and well illustrated. I’m getting super hungry. I’m sure my dog will keep me company too!
Matthew
December 13th, 2007 at 10:51 pm
Matthew – Oh, I am so glad you found the post helpful. Hope your dumplings come out great!
January 15th, 2008 at 9:36 am
I’m not sure how I stumbled upon your site, but I’m so glad I did. You’ve inspired me to make homemade potstickers.
I have a question. (Sorry if it’s sounds silly.) I notice on other recipes I have read for potstickers eggs or egg whites are used. Your recipe doesn’t call for them. Also your recipe is the only one I’ve seen so far that uses cornstarch. Are there reasons for this?
I plan on trying your recipe soon. :)
Anna
January 15th, 2008 at 11:22 pm
Anna – I think they’re both binding agents for the filling. I’ve just always used cornstarch which blends with the soy sauce and sesame oil so that it’s hardly noticeable. Can’t speak for the egg, but I imagine they have similar results! Good luck.
February 9th, 2008 at 2:40 pm
Great recipes Jen. Love your photography, too. Last year I made the pork dumpling I saw on your old blog. This year I made the shrimp ones for CNY. Both yummy. BTW, here in the Chicago area the Asian markets sell “dumpling wrappers (ShangHai style)” which are just flour & water & citric acid preservative. Not as good as homemade but still good. Many of the restaurants around here (mostly Cantonese) sell dumplings with very thick skins. We prefer the thin delicate dough which gets nice & crispy.
Thanks for the recipes Jen. Happy New Year.
Cyndi
February 11th, 2008 at 12:37 pm
Cyndi – I’m so glad you made the shrimp ones this year! Thanks for dropping by and also on the tip for the wrappers. I don’t even bother looking anymore, but they could come in very handy at times :) Gong Xi Fa Tsai to you too!!
February 13th, 2008 at 7:39 am
i can’t wait to make this recipe – quick question, though – i’m vegetarian, any suggestions for modifying the filling to be vegetarian? obviously, leave out the pork – but i’m not sure whether to replace in full with some sort of tofu product or increase the veggies? any suggestions would be great. thanks!
February 13th, 2008 at 7:53 am
Nell – hmmm, I think you can use stuff like Chinese leeks (see Rasa Malaysia’s latest post on dumplings – she used Chinese leeks), or increase the Chinese mushrooms, bamboo shoots. Maybe bind them with beaten egg or beaten egg whites? You could use dried tofu (like the dry tofu cakes I used in my lucky ten ingredient dish) or crumble regular tofu? Napa cabbage, chopped fine, is also nice. Sorry I can’t be of much help!
February 16th, 2008 at 3:48 pm
Jen, I love dumplings! The only thing is—I only eat seafood so I guess if I eliminate the ground pork, my potstickers won’t be as good. How can I make my dumplings moist? Any suggestions? Thanks.
February 16th, 2008 at 10:29 pm
hi jen! i spent tonight making potstickers w/ vegetarian filling. your recipe is magnificent! i love that the dough is so simple and so good. i made a large batch w/ the same veggies you use but roughly doubled, plus 2 packages of organic smoky tempeh strips – briefly panfried first for texture & taste, and then minced. i also used hot sesame oil which gave the potstickers some great kick (if you like spicy). i made a separate batch with garlic stirfried peapod stems (actually leftovers from takeout the other night) mixed with tofu, sesame oil, soy sauce and touch of garlic chili paste. both recipes were great, but the tofu ones are a little bland for my taste. i’ll add more chili paste next time, or the hot sesame oil. i didn’t do the raw egg b/c i wanted to see if these would be good as vegan, and they turned out SO delicious, no problem with binding at all. thanks again for sharing – i can’t wait to try your other recipes!
February 20th, 2008 at 8:20 pm
mamako – hmmm, I guess you could try to add some fat into the shrimp? i’m just not sure what kind. i’ve had dumplings in restaurants that are chinese leeks and shrimp – and they are to die for! but not sure about the fat. maybe add some sesame oil and some egg white and just watch the temp to make sure they don’t burn too quickly?
nell – great! i’m so glad it worked and that you liked it :)
March 3rd, 2008 at 6:35 am
[…] Didn’t have breakfast on Sunday until lunchtime… I guess you’d call that brunch… and even then all we had was plain porridge. But I felt somewhat well enough by mid afternoon to attempt making pot sticker dumplings from scratch using a wonderfully detailed recipe I found last week! There’s no point in me replicating the recipe here cos what’s important (to me) about this particular recipe is the step by step details with photo instructions, which makes it very very long but also a great tutorial! And I think I did pretty good for a first timer… absolutely clueless yes I managed to make pretty tasty dumplings! Some of which are now in the freezer cos the recipe whips up a pretty big batch (around about 36 depending on the size) for only 2 persons. Find the recipe here for delicious homemade Chinese dumplings. […]
March 3rd, 2008 at 10:13 am
For Mamako,
I actually did make the shrimp ones without the pork, used more shrimp & added a tablespoon or so of peanut oil (it’s pretty flavorless & doesn’t burn easily) Didn’t use any egg white and subbed 1/2 cup of bamboo shoots for 1/2 the water chestnuts, otherwise followed Jen’s recipe. (My husband always complains I can’t make any recipe without changing something)
March 4th, 2008 at 9:44 pm
Awesome! I am glad to hear of the variation and I hope they were good!
March 10th, 2008 at 8:56 pm
[…] found a recipe of chinese dumplings from ‘Use Real Butter’ blog. I told Mei don’t we make dumplings today and we shopped food what we need for making […]
April 15th, 2008 at 7:54 pm
Your website is awesome. All your recipe is so detailed and I can’t wait to try them all!
Thanks so much for posting all your delicious treat.
April 16th, 2008 at 12:08 am
Tini – thank you!
April 26th, 2008 at 9:53 pm
Hi Jennifer,
I love your shrimp dumplings. I finally made the dumpling yesterday with skin and everything. Without your step by step instruction my dumplings probably will look like something else . I am going home in June to my country in Jakarta, Indonesia. I think my mom will be proud of me!!
Thanks again! I love your website.
April 28th, 2008 at 5:15 pm
I googled “dumpligs” and I found this post! Wow, it’s a great pictorial Jen! These are by far the best dumplings reference I’ve found! They are so pretty and they look soooo good!
We teach a dumpling cooking class and we’ll tell our students about your post here!
April 30th, 2008 at 4:03 am
Tini – awesome!
WoRC – thanks sweetie. I didn’t know you guys taught a dumpling class! How friggin’ cool is that?! :)
May 18th, 2008 at 9:23 am
I not only love your style of food. I LOVE your pictures, too. It looks sooooo delicious! I tried to make pictures of my food, too, so I know that this is quite difficult…
I hope it’s okay when I put you in m blogroll?
Lovely Greetings!
May 20th, 2008 at 8:56 am
Sumpfhexe – sure thing. Thanks and I’m glad you like the blog!
June 3rd, 2008 at 4:12 pm
Yes, the entry was long but FABULOUS, particularly since it reinforced most of what I’m doing. The major difference is that I use ground chicken and sometimes no meat of any kind. I realize that this is probably not “Kosher” but once you add sesame oil, soy sauce, and fresh cilantro it tastes great. Also, I make the following alterations: fresh tofu, fresh ginger, fresh water chestnuts, no corn starch. Mine never seem to need it. They hold together fine!
I have taken this on as a major cooking effort, so my family has been humoring me by eating them at least 3 x’s a week. Originally(about 10 years ago) my neighbor Mrs. Shao taught me to make them, but I was always afraid to try to make the dough. It would take all afternoon and it had the feel of a quilting bee. We always made enough to feed the family and then freeze a few dozen. One thing, Mrs. Shao gave up on teaching me to “pleat” the dough. I’m going to follow your directions because even after reading them only once, I understand why I’m not successful at this(I always start the pinch at the end instead of the middle.
My main concern is what kind of pan do you use if you’re making pot stickers? Mrs. Shao always used tefflon. Although nonstick is not my preference, the pot stickers cook and brown wonderfully. What do you use?
June 6th, 2008 at 12:14 pm
Georgia – I use a nonstick pan. Glad you found the entry useful :)
August 7th, 2008 at 8:05 pm
Oh my god. I just made these [pork filling]. They were holy freaking fabulous. I can’t think of better adjectives to use. I’ve never had these bfore except maybe once or twice in random chinese restaurants, and I’m a novice cook. But they were perfect! They weren’t all perfect looking, but my boyfriend I ate them with a salad and you couldn’t slap the smile off our faces. !!!. I’m making them again tomorrow for my late birthday/Olympics party and I’m tickled that I’ll be making something chinese all by myself for the Beijing Olympics. Love your blog. These are totally do able for everyone. I subbed in some carrots that were in my fridge, since I’m in Mexico from a study abroad semester and couldn’t easily find bamboo shoots. I even lived through the tossing water in the pan part. !
Thanks! couldn’t be happier. seriously. awesome.
August 18th, 2008 at 6:26 pm
Marisol – yay! Really glad that you had such a good experience. It’s labor intensive, but isn’t that hard to do. Good for you and happy belated bday!
August 29th, 2008 at 9:21 pm
I made your dumpling dough and it was very good, thanks. I streemlined things a bit by rolling out sheets of the dough with my Atlas paste roller/cutter and rolled them to the #2 thickness and cut out the circles with a glass and layed them under plastic wrap and put the circles on a sheet pan covering each layer with plastic wrap. Then using a small meetball scopp put the filling on each one and pinched them up, worked great. I didn’t use your filling yet as I had some leftover sauerkraut and smoked rib and pork meat I filled them with. Boiled then browned in butter.
Here’s a pic of the dough.
Thaks again,
Jon
http://i186.photobucket.com/albums/x41/Jackitup1/dumplings.jpg?t=1220064852
August 30th, 2008 at 2:36 am
Hi, what is bothering me is that no one says which type of flour to use for the dumplings. How do you all know? I want to make dim sum and I can’t find a recipe to make the pancakes to fill.can anyone ehelp please. Cheers. Jean.
August 31st, 2008 at 12:35 pm
Regular flour is fine. I used high glutin flour as that is what I have around for making pizza and breads. It will give a bit more of a chewier texture which I like anyway.
Jon
September 10th, 2008 at 6:15 pm
Jon – awesome! Sounds like you’re on your way to becoming a pro.
Jean – sorry love, I have been out with illness for a while. I just use all purpose flour – works great.
September 10th, 2008 at 9:17 pm
[…] use real butter » Blog Archive » chinese dumplings and… You ve inspired me to make homemade potstickers. This allows the potstickers to dry out and crisp up. i spent tonight making potstickers w/ vegetarian filling. To serve: Serve dumplings or potstickers hot with your choice of dipping sauce combinations. I always worry that my plate is going to go flying and shatter on the floor amidst fallen potstickers that the dog would immediately dive into But it… […]
October 13th, 2008 at 9:27 pm
Wonderful! I just made my first batch of dumplings today. Sadly, I didn’t find this recipe until now (and I’m all done, lol)
I found that making dumplings is very time consuming! They seem so simple, what a lie!
I used wonton wrappers and they just looked horrible. I improvised a shrimp filling that tasted alright (but not good at all) I attempted to fry them, but it wasn’t right so I boiled them. They came out okay. Ugly, but okay. They were nothing like the dumplings my friend used to make for me.
So now that I have this recipie in my bookmarks I’m gonna go crazy and make enough to last me this winter!
Thank you so much! :)
October 13th, 2008 at 11:24 pm
Sara – Good luck with the recipe. I’m sure you’ll make awesome potstickers!
November 17th, 2008 at 12:01 pm
Jenyu ! WOW – I wish I had found your website ages ago ! I have been trying and trying to make chinese dumplings for my chinese-food-crazy toddlers and husband. They never work/never come out right/taste wretched/are too chewey/break etc Your website complete with vivid photos. detailed instructions and basic steps are a godsend – For the first time my family has truly appreciated home made chinese dumplings !!
Thumbs up !
Pillar
November 21st, 2008 at 10:04 am
Pillar – thanks and good on ya!
December 9th, 2008 at 8:53 pm
I’m about ready to attempt your wonderfully detailed recipe (once I get a good gluten-free AP flour mix), but a quick question for you – The ingredients list for the shrimp filling says raw, but in your photos it looks like they’ve been slightly cooked. Which is better?
Once I get brave enough to actually try this, I’ll let you know how the gluten-free version is…
December 9th, 2008 at 9:01 pm
Jim – oh, sorry about that. Those shrimp are pink when raw (the are… pink shrimp), so they look slightly cooked, but actually, they are raw – definitely keep them raw. Good luck!
December 10th, 2008 at 8:33 am
No problem, and thanks for answering so fast. I’m strictly an East Coast guy, and I’ve only every really seen the gray ones before, so I figured I would ask before burning the heck out of a batch…
January 6th, 2009 at 10:00 am
Great recipe for jiao.zi. I used to live in Taiwan and loved eating platefuls of dumplings after work. Simple and soooo satisfying.
It’s weird, tho. I live here in San Francisco and most of the Chinese restaurants that make dumplings make the skins so that they are too thick. Not delicate at all. Granted, we don’t want the dumplings to fall apart, but there should be a balance. I assume that the restaurants are using store bought mass-produced “skins”. Anyway, flour and water did the trick for us. Weren’t nearly as pretty as yours tho.
Anyway, love your website. Thanks for the tips and the pictures are great.
(BTW, I noticed what seemed like a picture of Taiwan on your blog. Have you been there???)
January 7th, 2009 at 8:18 pm
Wonderfully described and illustrated recipe! I’ll have to try your pleating method – I’ve only made potstickers/dumplings a few times but I made them round and gathered at the top. It was easier since no-one showed me how to pleat them. They still tasted good, but were a lot of work! I think it is best to make a big batch and freeze some for later use.
I’ve only made these with beef and would like to try with shrimp/pork. Can I use the baby salted (fermented) shrimps that come in a jar? I’ve had them for a long time and don’t know how to use them. They are so small they wouldn’t need to be diced. I would have to adjust the saltiness, but if I do mainly pork with perhaps 1/4 amount shrimp for flavour it might work…?
January 11th, 2009 at 10:01 pm
Sam – thanks! Hmm, I have never been to Taiwan, so it’s doubtful I will have a picture of it.
Leela – You can theoretically use anything in the dumplings, but for the shrimp/pork filling that I make – fresh really is very different from the salted fermented shrimps. The texture and flavor will be completely different, but you could still give it a try.
January 26th, 2009 at 3:46 am
Thanks! for the recipe!!! I made them and they turn out great!!! Everybody love them! It is a great recipe. Thank you for the pictures and all the tips.
One question, do you know the wonton dough recipe? Thank you
January 26th, 2009 at 9:50 am
Cristina – good for you! That’s awesome and I’m so happy you met with success. Unfortunately, I’ve never made wontons before, so I don’t have a recipe for the dough :(
January 28th, 2009 at 7:16 pm
Thank you, Jen! I recently got addicted to Chinese dumplings, but it was getting to be an expensive habit! I made my first today using your recipe and my wife and 3 year old daughter thought they were wonderful. I even used chopsticks to mix the dough and they came out great!!! I will be experimenting with this a lot!!! Thank you so very much!!!
Eddie
January 28th, 2009 at 11:27 pm
Eddie – that’s fantastic to hear and awesome that your family liked them. You are very very welcome. Good job!
January 30th, 2009 at 3:25 am
I’m gonna make these today for the Chinese New Year! Hopefully they’ll be yummy!
January 30th, 2009 at 12:26 pm
Red – best of luck and I hope you enjoy the fruits of your labor.
January 30th, 2009 at 9:54 pm
Heya – I love your recipes!!! Especially this one! I had fun making it for my boyfriend and his family!
I also parboiled the dumplings and use it for Hotpot!!! Great stuff and love them! Great pictures too!
February 1st, 2009 at 10:19 pm
Glitzer – sounds great!
February 5th, 2009 at 9:23 am
wow! instructions are so simple stated and its seems delicious. I’ll try this recipe for the family. thanks!!! :)
February 5th, 2009 at 12:51 pm
Indy – you’re welcome :)
February 7th, 2009 at 4:50 pm
Hi, My whole life I have been following my family’s recipe for dumplings. Today, I’ve rebelled against my family tradition by discovering your lovely recipe, which looks packed with flavour. Previously, I have used half the amount of vegetable ingredients, which I found my dumplings to be too dense and meaty tasting. I look forward to spending my Sunday this weekend making dumplings with this new and improved recipe.
Many thanks!
February 9th, 2009 at 10:43 am
Grace – I’m flattered! I hope you enjoy the dumplings.
February 15th, 2009 at 12:05 pm
Try using a pasta maker to roll out the dough. Works like a charm on setting 5.
February 17th, 2009 at 10:06 pm
Sandy – I don’t actually like uniform thickness to my dough – I roll them so that the centers are a tad thicker than the edges which may be difficult to achieve with a pasta maker. I’m a control freak anyway ;)
February 18th, 2009 at 2:36 pm
question: what happens if the dumplings stick to the bottom of the pan? i used a generous amount of oil and after it became nicely brown (and not stuck), i added the water, covered and came back a few minutes later to find dumplings stuck to the pan. there was still some water, so i waited until it all cooked off, but the dumplings remained stuck. our pan does suck, it’s a non-stick with many parts no longer non-stick. i was so fed up, i scraped off what i could and threw out the pan. bought a new one. all-clad. williams sonoma. but i wonder, did i do something wrong? any insight?
February 22nd, 2009 at 11:01 pm
Adrienne – well, I usually use a non-stick pan for these so couldn’t tell you about your pan versus an all-clad. Give it a try. I’m sure an all-clad would fare better than a non-stick pan whose stick has unstuck!
February 28th, 2009 at 1:39 pm
Hi. My cooking club tried this recipe with pork filling and they were very good. We steamed half and fried half. We extended the cooking times quite a bit, fearing the the still pink pork was not done. Does your pork stay pink?
March 2nd, 2009 at 8:50 pm
Stephanie – the pork when cooked can still be pink. You will notice a difference between pink and raw – but if you want to be on the safe side, use a probe to determine the internal temperature to be sure.
March 6th, 2009 at 1:31 am
Hi Jen,
can i checked 1 cup of water chestnut = hw many chestnut approx?
same with your flour. U mentioned 2 cups.
or can i checked hw big is ur cup to measure the chest nut and the flour
March 6th, 2009 at 9:19 am
Hi Jen,
I just wanted to say thank you so much for this recipe! Although I like my fillings with more soy, pork and sesame oil and without shrimp, these are just about the Chinese delivery dumplings of my New York childhood. Now that I live in Bristol, in the UK, it’s great to be able to make my own — and so much fun!
Thanks!
March 8th, 2009 at 8:55 am
Vivi – well, one cup is 8 ounces. It’s a volume measure. Hope that helps.
Folk – awesome! You’re welcome :)
March 14th, 2009 at 5:34 pm
thanks so much for the tips! i have been making dumplings for several years – but your technique for the dough rolling was new to me -i made dumplings tonight and it turned out perfectly shaped and flattened yet thicker-in-the-middle skins! thanks!
March 14th, 2009 at 5:39 pm
adrienne and all- it is my understanding from a college chemistry class i took tat you should immediately throw out any non-stick pan that has any parts scraped off or peeling. nasty chemicals. a good old fashioned cast iron fry pan that is seasoned well (the trick is to NEVER use any SOAP on it EVER) always works as a non-stick pan for us, though i have always steamed my dumplings, now i’m curious and i must try this potsticker technique!
March 15th, 2009 at 12:08 pm
Thanks so much for sharing this tutorial, Jen. I made some today and my family really loved them (made the pork/shrimp) – YUM!!!! I found that it helped to moisen the edges of the dumpling with a little water to help in the folding process. I’ll be making these again and again.
March 15th, 2009 at 4:32 pm
I have to say that this was the best step by step on any recipe I’ve seen. The photo’s were a wodnerfull help, especially for someone like me who has to see something to understand it sometimes.
Only problem, I sent a few dumplings accross the floor while flipping them onto a plate from the frying pan. However I can honestly say, while I really enjoyed the dumplings, so did my cats who caught the escapee’s.
March 16th, 2009 at 1:00 am
HI, Thanks for the reply. did it for e 2nd time with the measuring cup made me realise how stupid i am. Keke cos there a indication for 2 cups on it. Thanks for replying to this silly qns of mine.
Also, i used 2 cups of flour with 1 cup of water. My mum knead the dough and i did the wrapping. They tasted it and mentioned that the skin taste like flour. But the filling is very nice. So what is wrong with my way of doing??
Think i should used premade that can be easily purchase over the supermarket instead till i master the art of making the skin. :)
March 16th, 2009 at 10:23 am
Rachel – that’s fantastic to hear. Glad you had success and enjoyed them.
Beverly – awesome!
Lmai – oh no! I’m glad the kitties could enjoy the potstickers though :) I am a little scared of that flip move too.
Vivi – I don’t know. The skin probably would taste like flour if it’s made of flour, don’t you think? I never even thought about the taste of the skin before.
March 16th, 2009 at 10:05 pm
jen,
maybe i should be more specific. She say tasted like mee hoon kuay ( mian fen gao).
March 20th, 2009 at 8:29 am
Vivi – okay… I don’t know what that means, really ;)
March 23rd, 2009 at 8:55 am
I just found your sight through some links and I am so glad I did. I studied in Japan for a while and was able to eat these and I love them. I think I’ll make them in the next few weeks and was wondering if there are any helpful hints for a rookie?
March 23rd, 2009 at 6:36 pm
I found your awesome blog last night and decided to make potstickers and scallion pancakes today. They turned out great.. were really easy and yummy. If you have time, check out the outcome on my blog. Of course, it’s not as pretty as yours :)
March 24th, 2009 at 1:38 am
sooooo cool!i love.so many detailed pictures and step!you make it easy!!!!!!!
March 24th, 2009 at 4:59 am
My girlfriend cooked these last night and they were unbelievably wonderful. Thank you!
March 25th, 2009 at 9:24 am
Courtney – um, I think most of the hints I would have are in the post :)
Sey – thanks, so glad you had success!
Chinesefoodfan – thank you :)
Just Cook It – you’re very welcome. Nice job!!
March 26th, 2009 at 2:15 pm
This was an amazing recipe!. Totally worth the long amount of time it took to make. Though the dough recipe was only enough to make about half of the amount of Chinese Dumpling for me.
March 28th, 2009 at 12:06 pm
Yummeh – thanks! I think I always use the leftover filling to make meatballs for chinese soup.
March 29th, 2009 at 11:57 am
Hi Jen,
After a bunch of times repeating this recipe, I have some observations:
* 2 cups of flour’s worth of dough doesn’t go anywhere near enough 1lb of pork. I kept expecting it to when I made the recipe! I find I can get four or five batches of dumplings out of 1lb of pork, more if I add more veggies.
* The hardest bit for dumpling n00bs seems to be the pleating thing. I wonder if you have any suggestions on explaining it so you don’t end up with what I call Stegosaurus Dumplings.
* It might be helpful to note that dumplings swell when cooked, so “bitesize” in uncooked isn’t exactly bitesize when cooked!
Thank you so much again for this recipe. It’s fabulous!
March 31st, 2009 at 9:00 am
Folk – yup, you’re probably right. I suppose I make a double batch of dough for the filling, but I do so many things with the filling (like make meatballs) that it’s hard to keep track. My explanation for pleating is in the photos and text. I think it really requires some practice and experience before you can get the feel for it. They swell a little, but most of the time when I make them the size I want, they come out about that size (they shrink a little when you pull them out of the pan). Cheers!
April 7th, 2009 at 1:02 am
I was very scared when I couldn’t find the old page. Jen you are fantastic! I appreciate the update, and am also pleased that the poisons of Grad School are fading memories!
If you ever come to Sydney it would be my pleasure to cook some dumplings up for you! (does that sound wierd!?)
April 10th, 2009 at 5:19 pm
Jono – that’s really kind of you to offer! I have far too many people to visit if I ever make my way back to Sydney ;)
April 11th, 2009 at 8:10 pm
YAAAAY! I love this! I make dumplings at least once a week, and I am making them for my senior graduation party, but I always make them with wonton wrappers because I didn’t know how to make the skins. This is exciting! Thank you so much for your awesome instructions!
April 13th, 2009 at 9:20 am
Becca – great! You’ll love the rolled skins so much better than wonton skins :)
April 19th, 2009 at 3:55 pm
Thanks for the step by step pictures! This is my first time making them and they actually look authentic :) I made them with chicken and bought the dough at my local Asian market… will definitely make again. I experimented with pan frying, boiling and steaming. They all look great but the pan fried ones have an edge when it comes to taste. Goes great with chili oil!
April 20th, 2009 at 12:00 am
These are fantastic!!!! For white person i did a fab job lol!!! This is great recipe!!!
April 21st, 2009 at 5:43 pm
Meloxi – I have to agree that the pan-fried ones are soooo good :)
Minta – YAAYYY!!
April 29th, 2009 at 8:53 am
[…] When I decided to make some myself, I went straight to the source: Jen from use real butter has an awesome recipe plus photos that make the process really easy. I made the pork dumplings pretty much exactly to […]
April 30th, 2009 at 9:46 am
I’m so glad I found your site! I’ve always said that most food should come in dumpling-form. I love them. And I am most definitely trying this recipe out in the near future. Thanks!
April 30th, 2009 at 11:38 am
The Pumpernickel – Great! Hope you enjoy these too.
May 8th, 2009 at 3:24 am
Hi, I love this pot stickers recipe. Would it be better and less messy to steam it first and then pan fry it over a non stick pan, rather than pouring the water over a hot pan? Does this way create the same pot stickers?
hear from you soon. Bryan
May 9th, 2009 at 7:14 pm
Hi Jenyu,
Thanks so much for this most wonderful post. I’ve always wanted to make dumplings but never knew how to make the filling or do the pleating. I know some people wrote about using wonton skins. If you do use wonton skins will the pleating stick? Do you have to use egg to keep it together?
Also I really want to try your dipping sauce. I LOVE the dumplings that they make in Korean/Japanese restaurants, same thing but called Gyoza or Yakimando but I can never replicate their tasting dipping sauce. Can you take a pic of the Chili garlic paste so I can see what that looks like (jar and outside of the jar) since I’m sure if we have it in Canada the jar will look different.
Thanks so much for this. You rock.
May 9th, 2009 at 7:32 pm
Hi Jenyu,
I forgot to ask. Where do you buy the bamboo shoots? I’ve only ever bought bamboo shoots from a can. Is that sufficient i.e. fresh enough? The ones in your picture looks so fresh.
Also, thanks for all the pictures. The sure are helpful. I would have never known what napa cabbage leaves were.
May 9th, 2009 at 11:10 pm
Bryan – If you steam first and then fry, you will create more dishes. That said, I also think if you steam then fry, you won’t get as nice of a crunchy bottom. Pouring the water over the hot pan is a simple step and it’s really not that bad if you use a pouring vessel with a spout.
Aha – wonton skins don’t stick as well and are more brittle. In my opinion, they should not be used in dumplings because they are not only inferior, but they suck. If you use store-bought skins, there are specific dumpling skins in Asian grocery stores that probably don’t have egg in them. Most of the chili sauces come from China or Taiwan, so it doesn’t matter if you’re buying them in Canada or the states. You can find pictures of some brands here: http://userealbutter.com/2008/09/07/chinese-tofu-fish-recipe/ and the bamboo shoots I use are usually store-bought in cans unless I can score fresh bamboo shoots in California when I visit.
May 11th, 2009 at 7:22 pm
Looks like a great recipe! I look forward to trying it out.
40’s quite a bit, do they freeze well? If so, how long are they good for? I understand you’re probably not a scientist, but have you had any experiences with that?
May 13th, 2009 at 7:54 pm
Hi Jen! Thanks for posting up the proportions for the dumpling skins, you saved our dinner :D
Just wanted to also point out something – when we’ve made pot stickers, whether frozen or fresh, what we do is:
– liberally oil a cast/nonstick pan with a few tbsp of cooking oil
– place the dumplings in the pan (I pack them in close, they stick to each other a bit but I don’t personally mind)
– pour boiling water in the pan to half-cover the dumplings
– place the whole thing on the range at about medium-high heat, and cover with a lid till cooked.
– take the lid off and boil off the excess water (which should mostly be gone already)
– the dumplings will get a crunchy bottom shortly after after the water is all gone.
This way the dumplings never spatter from a sudden addition of water to hot oil.
Cheers
May 17th, 2009 at 6:32 am
[…] came across this interesting link with detailed description of steps for chinese dumplings. I took tips from here and made my version […]
May 17th, 2009 at 10:54 pm
Tooo good Jen! lovely explanation!! :)
May 20th, 2009 at 7:56 pm
Joh – You’ll probably end up with more than 40, but yes, they freeze well (if you read the post, it discusses how to freeze). Actually, I am a scientist and they are good for up to 3 months if properly sealed, but beyond that will likely experience freezer burn.
Allen – huh, interesting. Thanks for the tip. I may try it, although pouring water into the hot pan isn’t so bad if you have a cup with a spout.
Ria – thanks!
May 20th, 2009 at 8:21 pm
I had some of these from a restaurant today and had to find out how to make they ’cause they were so bloody tasty. Thanks for the step-by-step and detailed picture instructions, I’ll be making these soon!
May 21st, 2009 at 5:00 am
I want to make these to bring to a party this weekend but would like to make them the day before and then steam them at the party. Can I leave them in the refrigerator prepared overnight? Or do I have to freeze them?
May 22nd, 2009 at 7:44 am
Kifda – you’re welcome :)
Aaron – um, I wouldn’t leave them in the fridge overnight – the filling will sog up the dough and then it will all stick together and you will likely cuss, cry, or both. I suggest freezing. It’s not terribly different, just longer cook time. Good luck!
May 23rd, 2009 at 7:26 pm
Jen – Thank you for the detailed instructions! I learned the hard way that I shouldn’t stack up my rolled out dough…but once I re-rolled it all again we were able to fill and shape them. I also noticed that they stuck to the plate while I was making additional dumplings…maybe my dough was too sticky in general? The flavors were great and I’m happy to have some in the freezer for another week. Terrific recipe!
May 27th, 2009 at 12:56 pm
Phoo-D – oh, bummer :( Yeah, it may have been a little sticky, but I typically rub the base in flour before setting it on the plate (these buggers get soggy after a while). So happy that you like them!
May 27th, 2009 at 4:27 pm
Hi Jen,
Burned the bottoms to an embarrassing degree, and they still tasted wonderful. Great recipe!
June 1st, 2009 at 9:13 am
Tess – thanks! And yeah, there is some leeway, which is probably why I make them ;)
June 1st, 2009 at 12:52 pm
THose are such perfect pleats. I have made these before but am excited to make them again. Mabe if I practice I can achieve these kind of pleats! Beautiful Jenyu!
June 4th, 2009 at 8:38 pm
Oh YUM!! These were my family’s dinner tonight. I just finished “Mao’s Last Dancer” (book) and he kept talking about his mom’s fantastic homeade dumplings in it so I was inspired and your recipe was great. One question – I ended up using half ginger and half galangal. We had some galangal in the fridge and there seems like so few opportunities to use it…
Overall, great recipe, great pics. You totally inspired me to make homeade dough – something I NEVER would have attempted before. But now I’m always going to do it that way because it was awesome!
Amy
June 7th, 2009 at 10:56 pm
Lori – It just takes a little getting used to. Luckily, when you make dumplings, you have to fold a lot of them – so you get practice and perhaps will perfect them in your first batch? :)
Amy – Not sure what the question was, but in general the filling is pretty flexible which is why I love the “recipe” :) Kudos!
June 13th, 2009 at 8:45 pm
[…] months challenge was brought to us by Jen from use real butter. Jen gave us the challenge of making the entire […]
June 14th, 2009 at 12:44 am
[…] was hosted by Jen of Use Real Butter and you can see her instructions for making potsickers here and here. However, to make them gluten free, I used Elise’s recipe over at Hey That Tastes […]
June 14th, 2009 at 12:56 am
[…] is available here. Thanks to Jen at Use Real Butter for […]
June 14th, 2009 at 2:04 am
[…] in the center of each wrapper and fold the dough in half, pleating the edges along one side (see images in post for how to fold pleats). Keep all unused dough under damp […]
June 14th, 2009 at 2:50 am
[…] You can (and should) reference instructional photos and discussion on my blog post here. […]
June 14th, 2009 at 6:20 am
[…] to get them really picture-perfect, I was quite pleased with how they turned out. Jen has very thorough instructions (with lots of pictures!) on her blog which helped […]
June 14th, 2009 at 6:22 am
[…] was easy peasy pie. I did punk out and just used a fork to seal my potstickers, but Jen has some beautiful pictures on her blog showing her folding […]
June 14th, 2009 at 6:32 am
[…] gorgeous photos that’ll turn you into a dumpling/potsticker Queen/King in no time! Click jen yu’s amazing dumpling/potsticker recipe and instructions for the whole NINE yards of dumpling perfection, and then […]
June 14th, 2009 at 7:12 am
This post is amazing – thanks so much for it! My family is Chinese, but my mom never taught me how to make potstickers/dumplings (though she was truly a master at it!), so I’ll use your guide to make them on my own. :)
June 14th, 2009 at 8:26 am
[…] You can (and should) reference instructional photos and discussion on Jen’s blog post here. […]
June 14th, 2009 at 1:00 pm
[…] Add about a tablespoon of prepared filling to each disc. Then you fold the dough in half and pinch together to form little purses. There is no need to use egg whites or water to bind the ends because the dough is so fresh and moist. For a tutorial on how to fold your dumplings go here. […]
June 14th, 2009 at 1:51 pm
[…] much cheaper. And it’s really satisfying to make this stuff. Jen mentions in her original dumplings post that her family used to make these every Sunday, with her parents and her grandparents working […]
June 14th, 2009 at 2:05 pm
[…] You can find the recipe for the dumplings/potstickers, along with some great photos, here. […]
June 14th, 2009 at 3:52 pm
[…] sure to checkout Jen’s guide for creating perfect potstickers. Her step-by-step instructions were invaluable to me. Thanks, Jen, for sharing your family recipe […]
June 14th, 2009 at 4:28 pm
[…] the original recipe visit Jen’s blog – Use Real Butter. Below is my version of […]
June 14th, 2009 at 5:00 pm
[…] in the center of each wrapper and fold the dough in half, pleating the edges along one side (see images in post for how to fold pleats). Keep all unused dough under damp […]
June 14th, 2009 at 9:44 pm
[…] dough recipe came from sponsor of this challenge, Jen at Use Real Butter. Really, go to her site cause she’s got so much fantastic information regarding […]
June 15th, 2009 at 12:48 am
[…] center of each wrapper and fold the dough in half, pleating the edges along one side (see images in this post for how to fold pleats). Keep all unused dough under damp […]
June 15th, 2009 at 8:44 am
[…] This month was my very first Daring Cooks Challenge! It was something I always wanted to make but was a little unsure how, Chinese Dumplings. The girls and I both had a lot of fun making them. A big thank you to Jen from Use Real Butter for doing an excellent job hosting and providing direction. Anyone interested in trying should check out her original post on chinese dumplings. […]
June 15th, 2009 at 2:12 pm
[…] really don’t have much to say about this, Jen has such a fabulous description on her blog here (the original recipe) as well as here (the challenge […]
June 16th, 2009 at 4:04 am
[…] made potstickers before but failed miserably with the pleating. Now…thanks to Jen’s recipe with detailed photos, they now closely resemble the real thing! I love it! I couldn’t help but admire my […]
June 16th, 2009 at 10:02 am
Hahahahaha – this white person had perfectly round flat pieces of dough – because I used my tortilla press. However, my kids helped stuff and fold so they looked like alien invaders anyway.
June 16th, 2009 at 3:52 pm
[…] in the center of each wrapper and fold the dough in half, pleating the edges along one side (see images in post for how to fold pleats). Keep all unused dough under damp […]
June 16th, 2009 at 8:58 pm
[…] Jen’s post on how to fill and shape the dumplings. I wet the edge of the round with a bit of water to get the edges to stick if the pleating […]
June 17th, 2009 at 9:06 am
Carmen – that is wonderful! Good for you and I hope you enjoy them.
Mary – hey, whatever works, right?! :) So cool that you got your kids involved. Maybe they will become awesome cooks too!
June 17th, 2009 at 3:39 pm
[…] can be found at The Daring Kitchen, and you can also find some very useful tips and pictures on Jen’s blog. I loved this recipe!…Thanks to my sister, who taught me how to make these wonderful […]
June 18th, 2009 at 6:25 am
Wow – this is amazing! THANK YOU SO MUCH for such a well-layed out post. It explains it crystal-clear. I’ve never made these before, but I’ll definitely try, thanks to you! merci beaucoup!
June 18th, 2009 at 12:03 pm
GCiP – you’re very welcome :)
June 18th, 2009 at 2:27 pm
Hi there…..I made your potstickers the other night, but due to time I used the pre-made wonton wrappers. I followed your recipe for the filling along with the cooking process. I don’t see anyone else complaining of sticking so I must be missing something. I made two batches using two different types of pans. First I used a stainless steel pan and then went for the non-stick. They seemed to really stick after adding the water to the hot oil and not much difference between the pans. Do you have any suggestions? Maybe its because of the pre-made wrappers? We still munched them all up and they were delicious, however just an eye soar to look at.
June 19th, 2009 at 7:20 pm
Dumplings are the only chinese food I actually like so this is going to be a must try, although I need to get a steamer basket. Also, can you find bamboo stalks in the grocery store?
June 20th, 2009 at 1:40 am
Hi,
This step-by-step recipe was wonderful!
Thank you so much for making a chinese food a fun and interesting experience!
I will prepare them this weekend!!!
June 22nd, 2009 at 8:02 pm
Jaime – not really sure, but I don’t use wonton wrappers to make these because they contain egg. Perhaps therein lies the problem?
Shannon – you can find them canned and they’re usually labeled bamboo shoots.
Pablo – thanks!
June 23rd, 2009 at 12:33 am
Thank you so much. Now I know how to pleat those potstickers like a pro. I’ve watched so many TV programs but could never master it. Your photos were so helpful and tonight my potstickers looked like those at a Chinese restaurant. Very pretty! I used a store-bought potsticker wrappers this time but will definitely use your wrapper recipe next time. Store-bought ones were too thin and not at all like your pillowy wrappers.
June 23rd, 2009 at 1:27 pm
Hi Jennifer,
I feel an overwhelming urge to hug you right now. I have been looking and looking for something like this for the past year, but none of the recipes or the tutorials I found really seemed right to me. I spent a year living in China and every since the day I left, I’ve been a bit twitchy about not getting my weekly dumpling fill. And I agree, wonton wrappers just don’t cut it when you want real dumplings.
Seriously, I want to eat your photographs. I CANNOT wait to make these. Thank you thank you thank you thank you!
Also, I really love the design of your site.
Emily
June 26th, 2009 at 12:22 pm
Marsha – congratulations! I really think anyone can make these, just takes a little patience :)
Emily – you’re very welcome and thanks for dropping by!
June 29th, 2009 at 7:41 am
Thanks so much! i made pork and spinach dumplings for a potluck with my friends and your tutorial on pleating the dumpling helped a lot!
love yr blog and am linking you if u dont mind!
June 29th, 2009 at 10:03 am
[…] followed these extremely clear instructions from Use Real Butter. Did you know Guo Tie = Potstickers? It took a long time before I made the […]
June 30th, 2009 at 8:22 am
B.Rueh – mmm, spinach sounds great. Nope, I don’t mind the linking and thanks for the comment!
June 30th, 2009 at 7:08 pm
[…] 1. Take at least one yoga class 2. Learn how to cook 5 new dishes 3. Bake my own bread 6 times 4. Walk the distance of the Appalachian trail 5. Graduate from my master’s program 6. Write a letter to 3 friends for no reason 7. Read 10 books for fun 8. Go to 3 movies by myself (I never do this) 9. Go to at least one concert 10. Write a blog post at least twice a month every month 11. Try to grow my own indoor herb garden 12. Update my progress on my 101 in 1001 every month 13. Be active for 30 minutes at least 3 days a week 14. Patronize local vendors at least 6 times a year 15. Visit the Joslyn Art Museum 16. Make my own yogurt 17. Lose 15% of my starting body weight 18. Go to 10 local restaurants I haven’t yet tried 19. Participate in one “walk” (eg. Crop Walk, Walk for a Cure, etc) 20. Donate blood 6 times 21. Create a recipe & post it on my blog 22. Spend 6 weekends without going online 23. Find a religious community I feel comfortable with 24. Attend that community every Sunday for a month 25. Track all my expenses for 2 months 26. Create a budget that reduces my current expenses and increases my savings 27. Buy an article of clothing or an accessory in a color I never normally would 28. Have a picnic 29. Spend 15 minutes in nature outside the city doing nothing but listening 30. Organize my digital world. My files are a complete mess! 31. Learn to make 4 new vegetarian or vegan recipes 32. Take the bus instead of the car 10 times 33. Pass on a few things I want and do a Kiva loan 34. Floss. Every day. No excuses. 35. Go for one week without complaining 36. Replace one household or toiletries product with a more eco-friendly option 37. Learn how to wax my eyebrows at home (Don’t judge :-p ) 38. Make potstickers see here: userealbutter.com […]
July 2nd, 2009 at 2:40 am
[…] went straight to the recent host of the Daring Cooks, Jen at Use Real Butter for her dumpling recipe. First flour is sifted, and some water poured […]
July 2nd, 2009 at 1:41 pm
Thanks so much for the post. The dumplings made a great Top Chef party meal, and were pretty easy to make with your instructions. What a wonderful share.
July 5th, 2009 at 8:58 am
Andrew – how fun! That sounds like a great evening.
July 15th, 2009 at 12:25 pm
[…] the recipe and fabulous step-by-step photographs, see Jen’s post here. Thanks for a great challenge, Jen! Share with your […]
July 21st, 2009 at 9:49 pm
[…] You can (and should) reference instructional photos and discussion on my blog post here. […]
August 8th, 2009 at 11:19 am
Made an abbreviated version (brined chicken, green onion and chinese cabbage) and was really surprised how well they came out. Definite room for improvement, the dough needed to be rolled out thinner and I went rather beyond golden brown on the bottoms, but for a first try it was great. I even managed to make them look somewhat authentic.
Great article and great detail, thanks!
August 9th, 2009 at 9:14 am
Sean – wow, that sounds really good! You’re a total pro now :)
August 14th, 2009 at 4:32 am
[…] and varieties with different fillings. Take a look at these great guides for more inspiration (1, 2). You’ll see that dumpling making is a pretty serious […]
August 14th, 2009 at 6:11 am
[…] indl
August 16th, 2009 at 9:32 pm
Made potstickers today, but still cheated and used store bought wrappers. But I got pleating down perfectly (it’s definitely an ocd thing, but god they look gorgeous when even and 4 pleats per side!). Next time, and soon, making my own wrappers….and I know they’ll be heavenly.
(You should have seen my hubby buddy running to bring up your pics, when I was struggling with the the pleating on the first couple. Good online instructions, ma’am.
Thanks Ms Yu….your recipes are fabulous.
Next on my list….oh, it’s too hard to decide…
Jennifer A with the 16 1/2 year old much loved tomcat
August 17th, 2009 at 9:07 am
Just had a stab at these. Was originally going to use Wonton wrappers, but couldn’t find any anywhere so was forced into making some dreaded dough… blimey. They worked a treat! Got stacks of the little buggers too!
Think I made the pastry a bit thick, but there’s always next time to improve. They are delicious though!
August 18th, 2009 at 9:02 am
JennA – well thank you and congratulations on making beautiful dumplings!
Tomo – mmm, these things are so good. Now I’m feeling hungry and I don’t have any left in my freezer ;)
August 20th, 2009 at 11:30 am
Thanks for the great instructions and the meticulous pictures, that takes won ton of work! NYUCK NYUCK
We’re trying the pork version tonight for our special weeknight cook-together dinner. I’m really excited!
By the way, I did the calorie analysis on those, and for 100 dumplings it comes out to (roughly) 35 calories per dumpling! This is using store-bought wrappers. Using your dough, it’s only 22 calories per dumpling!! Next time I’m trying to make my own dough :) Calorie counts are about the same for the shrimp version, a little less but not much…unless you plan on eating the entire batch.
August 21st, 2009 at 10:14 pm
I love dumplings and I’ve been meaning to try cooking it on my own – and i’m so glad for your recipe. The last recipe I found was kind of bland. I tried this last week and it turned out really well. Although, next time, I think I’m going to reduce the amount of ginger since it was a little overpowering this time around. I still have to practice my folding though.
I love your site. I can’t wait to try all the different kind of recipes. Now that I’m living on my own, I’ve been getting the urge to experiment and really learn how to cook. I’m kind of bias, but I definitely have a strong affinity towards Asian food. Thanks for sharing all your recipes :)
August 23rd, 2009 at 11:29 am
[…] Detailed instructions here […]
August 28th, 2009 at 9:36 am
[…] a quick google-search for Chinese dumpling recipes, I think I found something that would work (http://userealbutter.com/2007/10/04/chinese-dumplings-and-potstickers-recipe/). *Note: this links to another blog that has a great description of the entire process. However, […]
August 29th, 2009 at 12:28 pm
Heidi – wow, thanks for the break down!
Swtiris – thanks!
September 3rd, 2009 at 7:48 am
WOW love the clarity of the photos, it looks as if I am nearly there in them by looking at them, so so slick!
September 9th, 2009 at 10:45 am
Thank you for the pleating instructions! These photos look beautiful!
September 21st, 2009 at 12:03 am
Thank you, this is the best online account of dumpling making I have found.
My friends and I are planning a dumpling production line for lunch soon. :)
September 22nd, 2009 at 1:15 pm
Thank you so much. Your how to photos are the best ever. Informative, well put together, and easy to follow. I need your book.
September 27th, 2009 at 9:35 am
Thanks so much! There is nothing better than a good potsticker!
I have a pork recipe that I adore, but have always wanted to try shrimp. I’m glad I read this because I would not have known to put in pork as well! I usually buy my wrappers at the Asian market, but now I’m ready to try making them myself.
October 11th, 2009 at 5:33 pm
Thank you, thank you, thank you!
I made these this evening and they were delicious. This was my first successful attempt at cooking asian food (not counting Indian food) and this recipe will be long-lived in my cooking future.
October 14th, 2009 at 3:07 am
[…] *headdesk* Ah well. That should teach me to read things more carefully in the future. Here’s the guide for those who would like a look. Otherwise, this is how I seal my dumplings, one-hand […]
October 24th, 2009 at 1:05 pm
Hello again.
My second attempt at making these turned out perfect. I am a terrible cook, and for something to come out perfect for me means that somebody else gives outstanding instructions and examples. You have my deepest gratitude. My wife loved ’em, and that’s is saying something!
I cheated and used wonton wrappers (they had no egg at all). I am sure that using the freshmade dough will make them better, but I don’t want to push my luck just yet………
Your blog simply “rawks”!!
October 25th, 2009 at 12:45 pm
Thank you for posting your story along with the recipe and photos.
In college I dated a Chinese guy, and he and his friends would have epic ‘dumpling parties.’ I learned the process and have continued hosting these dumpling parties throughout my life for all of my friends in various places life has taken me. I’m so glad to see that my process is exactly like yours. Dumplings are special, and this recipe has brought many different people together in messy sticky kitchens all over the country.
November 7th, 2009 at 12:56 pm
Thank you soooo much for your wonderful recipe. My husband is Chinese and has been asking me to make his dumplings. I was scared to try your recipe because I have only cooked Mexican food all my life. But I must say your recipe is PERFECT. I made the dumplings, I even made the wonton wrappers using your recipe. It was easy for me because I have practice making flour tortillas. My husband loved them so much. He said my dumplings were better than his mom’s.
November 7th, 2009 at 12:58 pm
Do you have anymore recipes to share? I would love to try more of your recipes.
November 24th, 2009 at 2:33 am
Hi, i am from Serbia(Europa), and just started to make dumplings. I found your recipe sooooooo good, and nice!! PERFECT!
Thanks a lot.
All the best
olja
December 5th, 2009 at 2:33 am
Tried your recipe for both the pork & seafood and was a hit. Chopped & made up the fillings & showed my two boys (10 & 13 yrs old) how to shape the dumplings. They made 60 dumplings & we did the pot sticker recipe. Will try the steam one next time for some variety & also add different ingredients..
Thanks heaps from downunder
December 28th, 2009 at 5:35 am
Oh , This reminds our old good days in China.
As non Chinese We enjoyed lots of dumplings during out stay….Still I can feel the taste.
Let me try again.
Cheers
December 30th, 2009 at 8:53 pm
Hey there! Had to thank you for this recipe. A few months back I found it, jumped around squealing when I realized what I’d stumbled upon and immediately went out and got the ingredients. This first time, I spent a few hours wrapping everything, got the oil in the pan hot (I’d just gotten new pots so I was even more excited) added the potstickers and had to call my husband in because they burst into flame. I boiled the rest and they were amazing.
After two hours scrubbing off the charred remains and a week to mull over my last adventure, I decided I just had to have potstickers again and set to work on a new batch. This time I didn’t heat the oil before putting them in and they were perfect. We had friends over that night and there wasn’t a single one left. Since then they’ve all been asking me to make them again.
I lost the recipe and had to hunt it down again. Now it’s saved and I’ll be making these weekly. I just can’t get enough of them. This recipe is also the most flexible I’ve been able to find. I have a few vegan friends and a seriously picky husband so it’s great to be able to find something everyone can agree on.
December 31st, 2009 at 7:51 pm
This recipe is awesome thank you
January 12th, 2010 at 9:28 am
Your pictures are awesome for someone wanting to know how to “fold” these! Yours look exactly like my mother’s – every time I try to make them she takes it from me and tells me I am messing it up – she’s real nice like that! In the meantime, I don’t learn! Now I will try it with your pics. Thanks for teaching me!
January 18th, 2010 at 9:12 am
[…] Adapted from Use Real Butter […]
January 21st, 2010 at 3:27 pm
[…] Butter for hosting this month and for giving us such a fun challenge. Visit her site to get her full recipe with all the variations, complete with beautiful […]
January 23rd, 2010 at 6:57 am
This is amazing! Thank you for taking the time to do this. My family is from Northern China and I’ve had the privilege of eating all kinds of dumplings growing up. I’ve only observed my parents making the dough from scratch and never tried myself. You have inspired me to wait no longer! Thank you!
BTW, besides shrimp and pork fillings, have you tried fish filling? Do you have a recipe you can share with us? Thanks!
January 24th, 2010 at 6:31 am
AMAZING! You made this so easy. Yesterday I made 80 dumplings for a party–froze half and pigged out on the rest. Yum!
January 26th, 2010 at 4:29 pm
[…] in half, pinch the top well, and pleat the sides of the wrapper until the wrapper is sealed. Use Real Butter has a great tutorial (and a different recipe) for how to seal dumplings, complete with a photo […]
January 29th, 2010 at 9:42 am
Jennifer – I haven’t tried fish filling before, sorry!
February 7th, 2010 at 2:48 pm
Early last week I got the idea to make your potstickers. Once I mentioned my idea I suddenly had lots of friends very excited about helping me eat said potstickers!
The night before the gathering I made a 1 1/2 recipe of the pork recipe, 1 recipe of the shrimp, a pot of hot and sour soup, and a pot of egg drop soup. The day of I made 5 recipes of wrapper dough -2 dough per each filling recipe. (Each dough recipe yielded 32 wrappers – I cut each quarter log into 8 pieces.) Is this even close to the ratio of dumplings you get out of your recipes?
Since I didn’t have experience in making dumplings I decided that my daughter and I would get a head start on making the pork dumplings and figure out the process. Within a couple of hours we had made 96 very respectible looking pork dumplings. When the other friends arrived we managed to whip out all of the shrimp ones in about an hour. All in all we made 170 dumplings!
I used your pan frying method to cook them all – keeping two skillets going until they were all cooked. They were fantastic! Between the soup and all of the dumplings that folks could eat, we had some satisfied customers!
For the dumplings that we made a couple of hours ahead, we had a bit of a problem when it was time to cook them. I floured a half sheet pan, but after sitting on the pan for a couple of hours some of them stuck a bit. How do you prevent sticking? Would you have frozen them? Floured more heavily?
Also, I have some cooked potstickers leftovers. How do you reheat? I figured I would lightly cover them and slowly reheat in the oven.
Thank you so much for your recipes and very detailed instructions. Everything was so easy to follow and very yummy. I will definitely think twice about buying the big ‘ol bag of frozen potstickers at Costco when I can make fresh ones at home that are soooo much better. Thanks again!
February 10th, 2010 at 1:47 pm
[…] I sought my favorite blogs for inspiration and was pleased to find the definitive source: userealbutter.com/2007/10/04/chinese-dumplings-and-potstickers-recipe/ . I grabbed up all the Asian ingredients I had on hand, which thankfully was quite a few and […]
February 12th, 2010 at 8:30 am
[…] Potstickers with Dipping Sauce I created my own recipe for the filling, but I adapted Use Real Butter’s dough (These dumplings taste just like you might find at your local Chinese restaurant, […]
February 13th, 2010 at 7:56 pm
Hi, thanks for your wonderful step by step recipe. I made them this evening for my very first time and it was a great success. Thank you so much for all the info.
February 15th, 2010 at 12:56 pm
Anne – I prevent sticking by cooking the dumplings within 30 minutes of wrapping them. If you let them sit out they will become soggy and stick. The yield will depend on how big you make each dumpling. Sometimes I make large ones, sometimes I make small ones (for appetizers or finger food). I reheat the potstickers either by microwave (but they are soggier) or by heating them in the pan with a little bit of oil. The oven tends to dry the skins out.
February 15th, 2010 at 7:33 pm
[…] you’d just bought the damn pre-made wrappers. If you reaaallly want to give it a go though, Use Real Butter has a pretty good guide on the whole process too. It’s pretty long too though, and to add to the list of tips, I’d add: the wrappers […]
February 18th, 2010 at 6:55 am
I made your dumplings last night! Wow! I’ve always used the dumpling pre-made wrappers, but now will never again. Making your own is easy and much better tasting. Thanks for your accurate and beautiful explanation. Happy New Year!
February 23rd, 2010 at 3:15 pm
[…] 2. The first few I assembled looked a bit odd and felt even more awkward to make. Don’t worry, after two or three you’ll get a pattern/technique down. I followed pictures from this blog. […]
February 23rd, 2010 at 10:52 pm
I am so excited to make these on sunday! thank you so much!
-liz
February 24th, 2010 at 9:43 pm
I’ve made this recipe twice, it’s absolutely delicious!
February 25th, 2010 at 11:51 am
I cant wait to make these. Yummers
March 7th, 2010 at 7:21 pm
[…] Egg Drop Soup & Chinese Dumplings (a combo of this recipe and this recipe) This is part of my "Taste the World" meme! Check it out and […]
March 25th, 2010 at 8:16 am
[…] An exhaustive post on gyoza (here called potstickers), including rolling and pleating images, and 2 filling recipes […]
March 27th, 2010 at 2:00 pm
Great recipe, made it today and they came out great.. Thank you very much for your time and pics.
March 29th, 2010 at 4:17 pm
I tried making dumplings before but the dumpling wrap was a disaster!!!! I bought the wrappers and the dumplings came out nice but I was not satisfied. After reading your posting and directions I have to say the dumplings looked and tasted great!!! Thank you so much… Can’t wait to take them to work ad show my Chinese friend who tasted my last dumplings and said the inside was nice….guess he wasn’t impressed with the store bought wrapper….Thanks again!!!
April 3rd, 2010 at 7:18 pm
Dumplings look great can’t wait to give it a try!!!
April 21st, 2010 at 8:13 am
[…] chopping everything – just don’t over process. She got the pork potsticker recipe from Use Real Butter (a cool cooking/photography blog). They also have a shrimp version. And she also looked at […]
April 22nd, 2010 at 2:25 pm
[…] not only can I make General Tso’s Chicken, Pho from Steamy Kitchen via Daring Bakers, and Pot Stickers(also Daring Kitchen via Use Real butter – I can also make Summer Rolls. It’s enough to […]
April 23rd, 2010 at 10:16 pm
Had this recipe on my counter for a month now… Made them tonight, and serving tomorrow : )
May 11th, 2010 at 2:28 pm
Wow – this looks amazing. Thanks for the great instructions and pictures. I am going to have to try these!
June 10th, 2010 at 3:21 pm
These are really good instructions! I have 1 question, do the potstickers freeze well? Could I make a big batch and freeze some to eat later?
June 10th, 2010 at 3:30 pm
Kate – I’d suggest freezing uncooked dumplings, not cooked dumplings. See my instructions on freezing at bottom of recipe.
June 22nd, 2010 at 7:22 am
[…] Link: Use Real Butter’s Homemade Potstickers […]
June 28th, 2010 at 4:05 am
[…] in the center of each wrapper and fold the dough in half, pleating the edges along one side (see images in post for how to fold pleats). Keep all unused dough under damp […]
July 3rd, 2010 at 3:41 pm
I am one of those people that will spend hrs cooking to mk stuff fr scratch. The taste really is so much better, and yes! It is worth it! Not only that, but I love the authenticity, I was looking for a good recipe, and I hv found it. I’m also vegan, so the dough recipe is perfect, no eggs, or any other animal products. The filling meat part, will be replaced by chiken gluten, I love it in everything! Haven’t made it yet, jus found this yesterday. But am hungry for it all ready, which means I’m going to think about it a lot which will result in me mk it sooner. Look forward to trying it, will let you knw how it came out. And if any modifications were md vegan style.
July 10th, 2010 at 11:08 pm
Wow!!! Done with such class…and never missing a beat in the detail. Thank-you!!! :)
July 20th, 2010 at 3:14 pm
Dear Jen,
thank you so much! I just made them and was in heaven eating these dumplings. I took your admonitions regarding the aesthetics of the dumplings very seriously and ended up shaping the dough with a wide rimmed glass. And the little pouches turned out lovely and delicious.
No water chestnuts, so I put a stick of celery, very finely diced. And my meat was a mixture of pork, lamb and beef.
I infused some olive oil with garlic, crushed chili peppers and ginger, strained it, added soy sauce, rice vinegar and finely diced spring onions and ended up slurping it out of the bowl.
This was my first time making any kind of dumplings, dumpling dough or dumpling filling and the fact that they turned out perfectly tasty and pleasing to the eye is a testament, Jen, to your masterful teaching techniques.
Next is bibimbap. Bring it on, Asian recipes!
August 10th, 2010 at 10:23 pm
Hi, just want to congratulate you for an exceptional page! Great step by step instructions and even better photos…hugs for the lovely dog.
Being doing a special project and have checked the same information on several search engines,however, your take on Chinese dumplings recipe has been far the best.
Congratulations!
September 2nd, 2010 at 10:24 pm
This was great. I tried another recipe today and went looking for better folding instructions and found this. The recipe I had called for cooking all of the veggies/meat beforehand, and it ended up being kind of crumbly inside of the dumpling (but maybe that was my fault). I’ll be sure to try your method next time, with the pretty pleating!
September 12th, 2010 at 6:06 pm
[…] Pork Dumpling Recipe (from Use Real Butter): […]
September 24th, 2010 at 12:28 pm
I will try anything in the kitchen at least once because anything homemade is better than factory-made. I found your recipe through foodblogsearch and was impressed by your detailed instructions, so I gave it a go. My dumplings were… well, ugly (they didn’t curve and looked more like ravioli), but they tasted so phenomenal – so much better than any dumpling I’ve ever had from a supermarket or restaurant – that I am going to keep trying until I get the shape right. Thank you so much for the recipe and the tutorial!
September 29th, 2010 at 4:34 pm
This is one amazing post, you make this look so easy, I can’t wait to try it.
October 1st, 2010 at 6:56 pm
Hi! I can’t wait to make this. I was going to go into Chinatown, NYC tomorrow to get some frozen ones so I could make them at home but I figured I love dumplings so much that I should just make them–and why shouldn’t I–I love to cook. Can these be prepared and frozen for future use or no?
October 1st, 2010 at 7:00 pm
haha reading is fundamental–I read through to the bottom and saw your tips for freezing lol! Thanks again for these great instructions.
October 5th, 2010 at 11:01 am
hei hei.. very good!! saludos desde Mexico.. hahaha.. llevo dias buscando una receta.. para poder hacerl los dumpling.. ya la encontre aqui.. congratulations!!!!..
October 15th, 2010 at 12:55 pm
This is a great recipe! I currently keep a food blog about making real food from scratch in my college dorm room, and I used your mother’s method for making the dough to my own dumplings (alas, no food processor in the dorms). I posted a link to this page, and I just wanted to let you know, as well as make sure that is ok! Mine are not nearly as beautiful as how yours turned out, but I believe this is something that takes practice, and that I am willing to dedicate more time into perfecting the art ;) Thanks for the recipe!
November 15th, 2010 at 4:11 pm
I have a quastion: what kind of pork do you use?
November 17th, 2010 at 2:16 pm
Elvira – regular ground pork that I buy in the grocery store. Although if you ground your own, I’m sure it would be awesome.
November 18th, 2010 at 12:38 am
[…] Adapted from: Use Real Butter […]
November 20th, 2010 at 10:21 pm
Thank you for the great recipe and directions. I made these today with my 3 & 5 year old. We had fun making these together and they came out great!
December 7th, 2010 at 11:42 am
[…] Chinese food but could never recreate it at home, especially potstickers. I found a great blog, UseRealButter, that showed step by step instructions on how to make them. I make these babies in bulk and given […]
December 12th, 2010 at 10:59 am
Thanks for the guide, it was really helpful.
A quick question: After the water boils away do you ever notice a thin film of residue at the bottom of the pan? I’m guessing it’s what happens to any excess flour after the water boils away. It’s really a pain to get rid of.
December 18th, 2010 at 2:15 pm
using pork, chicken or hamburger for dumplings or potstickers (i prefer using hamburger with other spices mixed in), will steaming 7-8 minutes or boiling 7 minutes cook the meat, or can i fry the meat and mix other spices in, then put in dumpling/potsticker and boil or steam. i am new at this cooking, but started couple of months ago making calif sushi at home also expanding a little
December 18th, 2010 at 2:29 pm
jorge – haven’t noticed, it’s usually browned and crisp (and sticks to the bottom of the potstickers)
bill – yeah, steaming or boiling for 7 minutes should do it, no problem. I guess you could cook the filling first, but that’s not really necessary and in my opinion, kinda makes it harder to wrap. good on ya.
December 18th, 2010 at 2:30 pm
Thank you so much for these wonderful directions and photos. I really want to just make these right now! They do look absolutely amazing and so perfect. I only hope that mine taste as good as your look!! Thank you, again!!
December 29th, 2010 at 11:52 am
I did make these last weekend for my family and we all really enjoyed them. I actually used ground turkey and they turned out amazing! I was expecting it to be a lot more work. I will definitely make these again!
January 7th, 2011 at 4:29 pm
I’ve made many of the recipes on your site and have always enjoyed them. This recipe was a little intimidating but I finally got the guts to make it and I’m glad I did, they were delicious! I can see what you are saying about being time consuming though…I think 40 potstickers took me 3 hours haha!! My biggest issue was rolling and shaping the individual wraps but it was well worth it. Thank you for sharing the recipe.
January 10th, 2011 at 7:23 pm
We just finished doing these dumplings and they were amazing. Well done for sharing the very detailed process. Will post pictures on my website soon.
January 12th, 2011 at 10:25 am
Wow looks great and I love to cook. What if I dont have bok choy??? I live in italy. Is there a subsitute lettuce or cabbage??
January 13th, 2011 at 12:23 pm
taylor – you could omit the napa cabbage as you like or use regular cabbage as a substitute.
January 24th, 2011 at 4:57 am
The directions for assembling and freezing the dumplings are excellent. I am taking them with me next weekend to a friend’s and had to make them in advance. I think I left another comment about them somewhere, but not sure what happened to it. Basically, frozen first outside in subzero temps in Vermont. Wonderful website and wonderful photography. At first it was painstaking, but I made the last 25 in about 30 minutes. I added more work by boning and skinning the duck meat I used to fill them. I am reading a book with a lot of references to duck recipes. The duckmeat is delicious in the filling.
Bobbi
Warren, VT
January 28th, 2011 at 7:40 pm
I am here every year for your great dumpling recipe. Made them for my son’s birthday party & now for CNY. Have to admit I have never tried making the dough, I cop out & buy the wrappers. But the filling is the best. I used another recipe a few months ago, not nearly as good. So here I am again. I did learn how to pleat the dumplings from your pics & have to say, modestly, I am pretty good now. I won’t let anyone help me either. Yup, control freak here.
February 7th, 2011 at 7:51 pm
I just made your dumplings tonight. Thank you so much for this recipe! I am very much a beginner…need a lot of practice with those pleats! I know I’ll be making these with my kids at least every CNY, but probably much more often. Thanks so much for the photos. They smell delicious…cant wait to eat them! We froze them and will cook them up in a few days to share with our friends.
February 9th, 2011 at 9:48 am
Hello,
I can’t belive I only just came across this recipe! Ahh so much missed time to devour dumplings!
Quick question though do you think whole wheat flour will work just as well as AP?
thanks!
February 9th, 2011 at 10:18 pm
[…] was a combination of ground pork, ginger (SO GOOD), green onion, cabbage, etc. etc. Gord got the recipe from the blog Use Real Butter, and I was pleased to see that there were detailed photos to guide us […]
February 11th, 2011 at 11:16 am
I made 180 for 7 people I only had 20 left! Thanks for the great recipe
February 11th, 2011 at 3:11 pm
Please be careful adding that water to a hot skillet – I recommend you just put in an equal amount of ice cubes or crushed ice. It may take a little longer but it is a lot safer… Thanks for the great recipe!!!
February 12th, 2011 at 11:07 am
My mother and I tried this recipe, neither of us had ever made any type of dumplings before and she had never had potstickers before. We used chicken instead of pork and they turned out great… although, in true white people style, they were extremely ugly and mismatched looking
February 12th, 2011 at 3:33 pm
Yosha – Well, I have never tried using whole wheat flour, so I couldn’t tell you. You might want to google it (or if you can’t find anything, try 1/2 and 1/2?)
February 14th, 2011 at 10:33 am
I used to make dumplings with wonton skins a couple of years ago, but always thought the recipe was too bland. Came across this recipe through a google search, and OMG perfect! I even left the wonton skins in the fridge and made my own dough, so yummy and perfect. They were a big hit at my husband’s birthday party, none left! I have already peered through more of your recipes, and thanks to the helpful hints you throw in, have finally achieved non-squishy hashbrowns and delicious stir fried rice too. <3 Thanks! I'll be back!
February 14th, 2011 at 2:51 pm
[…] ei olnud. Siis kobistasin veidi mööda Interneti imelist maailma ringi. Põhiliselt juhindusin sellest äärmiselt põhjalikust ja ilusast juhendist, väikeste käepäraste mugandustega. Samuti on […]
February 20th, 2011 at 3:50 pm
best dumpling recipe ever me and my friends use it every time
February 21st, 2011 at 4:52 pm
Yosha – I tried using wheat flour once, and it was rather disappointing. :(
If you are preparing them for yourself, you can try it and see if you like it. But if you are preparing for guests, please stick with AP flour, you and your guests will be glad you did! :)
April 3rd, 2011 at 2:32 pm
You may have to use more than 1/2 cup of water in the dry Colorado climate…mine was too dry and broke…but, just added water to my hands to bring together. Your pics make the dumpling look easy! I say, as long as they ‘look’ like a potsticker, than that’s all that matters! Cheers!
April 11th, 2011 at 9:03 am
This is such an amazing website. i grew up in Hong Kong and dumplings are one of my favourite things. In fact i am cooking them for a presentation at work on thursday so your recipe will be very useful! Thank you!
April 17th, 2011 at 7:27 pm
Hi! I love your recipe, specially since it has so many nice/helpful pics. I’ve wanted to make dumplings for a long time and yesterday I decided I was going to, so I went and bought all the ingredients, well most of them because I couldn’t find Napa cabbage. Is there any ingredient I could use instead? Thanks!
April 17th, 2011 at 8:22 pm
Rebeca – you could use regular cabbage (you don’t even have to use cabbage if you don’t want) :) Hope they turn out!
April 25th, 2011 at 9:21 am
[…] dough, I have used the same recipe several times before- thanks to Jen Yu from Use Real Butter. For the recipe click here. I will give you the details […]
April 27th, 2011 at 9:08 pm
Hi there, i would wanna know if i wanna make about 20-25 dumplings how do i divide the pork filling needed as well as the dough? Divide them by 4? i wanna do them as a surprise for my parents :)
Love your pictures making me salivate infront of the screen now! You’re awesome!
April 29th, 2011 at 10:14 pm
Genevieve – Generally yes, but it depends because beginners tend to use less filling per wrapper. As you become more adept then you’ll use more filling per dumpling. Hope your folks enjoy them!
May 12th, 2011 at 6:30 pm
Great post! I always wanted to make these, but thought there had to be some kind of magic involved.
Now I have the courage to make some myself!
May 27th, 2011 at 8:56 am
OMG! Made them over the weekend and (on the second batch), the were awesome. I don’t think I will ever buy dumplings ever again. If I want them Ill make them. Even though you suggest not to, I think nest time I’ll use my food processor and see how that turns out. I’m far too lazy to do all that chopping again unless the method is drastically inferior.
June 9th, 2011 at 3:03 pm
[…] Filling for Potstickers (inspired by and adapted from Use Real Butter and Cook’s […]
June 19th, 2011 at 4:01 am
Lessons learned:
1) For most of the ingredients, a food processor Does Not Work. For the mushrooms, though, it’s ok. Something about their texture lets them food-process right up into perfectly-minced bits. (Cut ’em up a bit first though – at least into quarters.)
2) Shaping the dumpling gets easier with practice. By the end of the batch, I pretty much had it down pat. If I made these often enough, I could see it becoming muscle memory.
3) Just because these are Chinese, does not mean I should cook them in a wok. By the time the ones on the outside are golden brown, the ones on the inside will be burned black. Flat-bottomed pans are the way to go.
4) Patience is a virtue. Cooking these on medium-to-low heat is perfectly ok. If I absolutely must cook them on high heat, however, I should not use a plastic spatula to remove them, lest I coat the bottoms of my potstickers with molten plastic.
5) Plan ahead for these. From start to finish (not counting shopping time), these took a little over five hours to do.
6) THEY ARE SO WORTH IT. Despite the time, despite the messy kitchen, despite the fact that I burned the first third and ruined the second and thus only the final third came out the way they were supposed to, I became the hero of my household for making these. They were absolutely delicious and I REGRET NOTHING.
June 20th, 2011 at 8:34 pm
thanks for the recipe and very helpful instructions! the photos are BEAUTIFUL and your help greatly improved my form and flavor (see twitpic link for some ugly first and somewhat prettier last attempts, http://twitpic.com/5ej4jl ).
they are TASTY and we’ll be happy to eat continued practice efforts!
July 3rd, 2011 at 10:28 am
Thank you for the pictures on how to make the dumplings. I wish I had found your posting before I made my first attempt at the dumplings. They were ok but the next time I expect them to be Great. Thank you for taking the time to teach us the right way.
July 8th, 2011 at 3:40 am
OMG these are fab!! this is the first time EVER making these and the recipe is faultess thank you so much!!!
July 14th, 2011 at 1:14 am
Looks like heaps of work, but that just makes the result all the more tasty.
Thanks for the recipe
July 23rd, 2011 at 8:39 pm
Wow these were amazing! thanks so much for the dough recipe and tips as well as the pan-frying recipe. I have always thought it was such a drag having to boil pot stickers and then pan fry them later to get them crispy.
Thanks!
July 26th, 2011 at 12:50 pm
thanks for the recipe. I’ve made dumplings a few times, but they never seem to have that perfect flavor I’m searching for. I just made some this weekend, and once again, not 100% happy with the results. Maybe 80-85% of the way there, so getting close. I’m going to print out your recipe and try it. They look great – hopefully, this is the recipe I’ve been waiting for! Thanks again, Jen! Dan – Palm Springs, CA
August 4th, 2011 at 11:10 pm
I am completely unfamiliar with Asian food in general besides stir-fry and teriyaki. The pictures made this recipe very less complicated. And the cooking technique (pan-fry) was broken down so simply! If you just read it and do exactly what it says, they come out absolutely perfect! I thought that this was going to be a disaster, being the first time I’ve made anything like this and surprisingly IT WASN’T! haha I was like, yeah my cooking time is going to be wrong and I won’t get that nice browning on the bottom but it was completely in reach and it worked! :c D My folding needs work, but, it was my first time :c D Thank you so much for breaking down a seemingly impossible recipe! It did take a large amount of time, but I guess I just work slowly haha I’m sue it gets faster the more times you make them. I made them for my family and they were like wth is this? but they loved them! haha Thanks so much again! The tasted AMAZING!!! My brother asked if I was going to apply at an Asian restaurant lol! He said they were gourmet and I agree :c D You simplified everything so well! And even added detail to make sure someone’s poor back didn’t hurt, aww! You told us all the stuff it doesn’t say in recipe books and all the tips and tricks. :c D I am severely pleased with the end result! <3
August 15th, 2011 at 6:31 am
when you freeze the potstickers do you need to boil them before you can freeze them
August 15th, 2011 at 9:17 am
Helen – when I freeze the dumplings, I don’t cook them at all before freezing.
August 21st, 2011 at 3:21 pm
[…] not gonna stop you for trying to make the skins from scratch. I suggested you to follow a post of Use Real Butter for step by step dumpling […]
August 23rd, 2011 at 12:52 pm
These were amazing! My brothers loved them. Thanks so much, you are my hero! <3
September 17th, 2011 at 12:00 am
I confess, we did not use pork.
We used chicken breasts, chives, Chinese cabbage and celery, adding some peanut oil for fat. The dough, though, we made it as your Mom’s recipe, teaspoons of water at the time.
We live in China and this was our third attempt to make the dumplings at home (they make awesome ones at the corner of our home, so we can have them anytime) and we decided to try something completely different.
Thanks to you, this is the first time the dough is perfect and, although the shapes are NOT what are supposed to be, the taste of the potstickers (first oil, then water – and duck!) was excellent.
Since last night (when we discovered your blog, looking for dumpling’s recipes) this has become our favorite website and we cannot wait to try our own wonton soup, among other things :D.
Thanks again from your home-country!
Expats in Shenzhen
September 17th, 2011 at 12:01 am
I confess, we did not use pork.
We used chicken breasts, chives, Chinese cabbage and celery, adding some peanut oil for fat. The dough, though, we made it as your Mom’s recipe, teaspoons of water at the time.
We live in China and this was our third attempt to make the dumplings at home (they make awesome ones at the corner of our home, so we can have them anytime) and we decided to try something completely different.
Thanks to you, this is the first time the dough is perfect and, although the shapes are NOT what are supposed to be, the taste of the potstickers (first oil, then water – and duck!) was excellent.
Since last night (when we discovered your blog, looking for dumpling’s recipes) this has become our favorite website and we cannot wait to try our own wonton soup, among other things :D.
Thanks again from your home-country!
Expats in Shenzhen
September 26th, 2011 at 7:50 am
[…] Pork and Shrimp Dumplings/Wontons (adapted from Use Real Butter) […]
October 29th, 2011 at 2:11 am
What a wonderful blog! Thanks for the detail and the pix. Just made these potstickers with my babe (we used beef/ celery/ carrot instead of pork/ cabbage/ bamboo shoots) and they were awesome! Have frozen a heap and am looking forward to these lots in the future.
November 13th, 2011 at 4:40 pm
ZOMG, I love you, thank you. My favorite dumplings (and egg rolls, soooo full of cabbage, which I love) were at a restaurant that was sold, and the new owners didn’t buy the original recipes, but I now know how they made the wrappers for the dumplings and potstickers.
And I agree 150%, dumplings require homemade wrappers. Abso-freaking-lutely, thank you SO MUCH.
And your photography is beautiful. (I have a camera fetish as well)
November 15th, 2011 at 3:28 pm
[…] to squeeze out enough time between kitchen remodel work and baby wrangling to make a combination of this recipe and one from The […]
November 15th, 2011 at 8:54 pm
Me and my friends made this recipe! it’s so good. and i love the homemade wrappers so much better! still havent gotten around to making it the dumplings the right shape tho =[ nor the dough thin enough. i love this recipe!! thanks for posting it!
November 26th, 2011 at 11:55 pm
I didn’t see this mentioned anywhere in the comments so I wanted to ask if the filling comes out soft when cooked. I’ve made potstickers before using other recipes but it seems that the filling always comes out like hockey pucks. In my favorite restaurant for potstickers, the filling is soft and not hard like mine come out. Your ingredients sound perfect and I can’t wait to try your recipe!
November 30th, 2011 at 4:25 am
making this today – great instructions
November 30th, 2011 at 12:58 pm
Dianna – it doesn’t come out super soft when cooked, but it isn’t hockey pucks either. To make it more tender, you can add more cornstarch and some more chicken broth to the mix.
December 6th, 2011 at 2:14 am
Thank you thank you thank you! We moved away from Singapore after more than a decade there and we miss the street food so so badly. There’s just nothing like a bowl of hot dumpling soup. Thank you very much for your detailed recipe, especially the pics about folding the dumplings.
December 6th, 2011 at 10:34 am
[…] recipe to the bitter end. After rassling with Google a bit, I happened upon Jen and her foodblog, Use Real Butter. Her photography is a hardsell and I fell for it. After more than 2 hours of fiddling around in […]
January 9th, 2012 at 3:38 pm
I LOVE LOVE LOVE this blog…. you have no idea how many times i have referred back to it – and have just made my third batch of awesomely perfect dumplings. And your pictures are superb! Thank you SO much for putting so much time into this page!
January 13th, 2012 at 12:00 pm
[…] Pork potstickers […]
January 22nd, 2012 at 6:47 pm
[…] Adapted from Use Real Butter […]
January 23rd, 2012 at 6:16 am
[…] the wrappers out by hand. Jennifer Yu gives a great step-by-step guide and recipe on her blog Use Real Butter; she explains the process so much better than I ever could. What I share here is my filling recipe […]
January 24th, 2012 at 11:29 pm
I admit, I cheated and used packaged gyoza wrappers… but I used your shrimp filling recipe. It was SPECTACULAR!!! Our pleating was pretty good by the end, and next time we’ll make the wrappers and they’ll look better, I’m sure – but they were delicious!
I even made them with turkey instead of pork — I’m dying to try the pork ones, but I’ll have to wait until the boy is out of town because he doesn’t eat mushrooms or pork… so sad.
January 25th, 2012 at 2:50 am
[…] got my recipe info from URB. Do you see a theme here? URB is […]
January 25th, 2012 at 11:40 pm
[…] million thanks to Use Real Butter’s blog post for the dough recipe and helpful step by step. If these pot stickers are this good using food […]
January 28th, 2012 at 7:37 pm
Jen, I’ve made your dumplings four times now, and they are so, so good. We have a Chinese exchange student who loves them. The only thing I’ve had to do a bit differently is the dough. I do it by hand but I always need to add a little extra water for this dry Colorado climate. Your tutorial is the best on the Internet–thank you!
January 29th, 2012 at 3:24 pm
I am so excited to have found this site!!! I just made these potstickers (vegan….just with what I had on hand like bok choy, shitake, carrot, scallions and with lots of garlic, ginger, shoyu, and sesame oil) The skins are so very yummy!! Your tutorial is fabulous!!! Thank you so much for this post. The dumpling skins are easy and delish!!
February 1st, 2012 at 1:02 am
[…] Pork potstickers […]
February 1st, 2012 at 8:05 am
[…] Pork Pot Stickers Adapted from Use Real Butter […]
February 5th, 2012 at 12:48 pm
[…] with many different kinds of filling, combining various types of meat, vegetables, and spices. Here are a few of the many recipes available online. (If you’re interested in exploring more Chinese […]
March 4th, 2012 at 3:46 pm
Thank you. That was totally amazing and funny too… (The dog was so interested.) I’m going to make it for New Year’s… But I will have to start early. SO hard it looks.
March 16th, 2012 at 12:34 pm
[…] This website has the best instructions for working the dough and forming the dumplings. Also it’s just an […]
March 16th, 2012 at 6:01 pm
I had your recipe link saved on my old laptop and nearly had a coronary when it died and I couldn’t find your recipe. I couldn’t remember how it was worded so I started googling combinations and I knew I would know the recipe by the pictures. I could picture the big round pan stuffed full of dumpling yumminess!! Thank you so much for posting this! I’m going to make them this weekend – although I’ll bet mine won’t be nearly as pretty…haha!
March 18th, 2012 at 11:08 pm
[…] userealbutter-Chinese dumplings and pot stickers […]
March 26th, 2012 at 3:18 pm
[…] with many different kinds of filling, combining various types of meat, vegetables, and spices. Here are a few of the many recipes available online. (If you’re interested in exploring more Chinese […]
March 31st, 2012 at 6:28 am
[…] на виткање на кнедлите можете да го видите овде и овде. извадете го тестото од кесата, направете […]
April 16th, 2012 at 12:06 pm
thank you so much. the photos and instructions are superb. my son is married to a lovely young woman from beijing, where they live. they recently visited us in new mexico with her wonderful parents. yang, her mother, showed me how to make dumplings. and i wanted to reinforce what i learned by looking on the web for making dumplings. i need go no further than your site. it is brilliant. my daughter-in-law showed me how to roll out the dumpling with a narrow diameter rolling pin so that i always keep my thumb in the center, protecting that middle part so that it is slightly thicker than the rest of the dough. you mention keeping that part thicker. she also said that the flour is a little different in china. do you have any thoughts on this? perhaps, a higher gluten content?
thank you so much,
judy
April 17th, 2012 at 2:51 am
Judy – I don’t know what the difference in the flour is, but I know that unbleached AP flour in the US works well (according to expert Andrea Nguyen). Glad you enjoyed the dumplings!
April 24th, 2012 at 1:18 pm
[…] in the center of each wrapper and fold the dough in half, pleating the edges along one side (see images in Jen’s post for how to fold pleats). Keep all unused dough under damp […]
May 8th, 2012 at 1:31 pm
Amazing post—thanks! Loved your detailed instructions, especially on how to roll the wrappers. Not sure why, but while skins look and feel amazing during wrapping, they seem a bit mush after cooking. I realize I may be overboiling them, but I get suspicious when the dumplings float to the top in 2 minutes, so I boil them longer for a total of 6 minutes. From your experience, does the “float to top” rule always work for making sure the dumplings are properly cooked through?
May 8th, 2012 at 1:34 pm
Izzy – yes, I usually follow the float to the top rule and haven’t had any issues, although I typically make potstickers and not jiao-tze. Why not try boiling until the float, take one out and cut it in half to see if the filling is fully cooked? Hope that helps!
May 12th, 2012 at 2:31 pm
This was my first venture into Chinese cooking and thanks to your great instructions everything came out pretty well. I’ve formed dumplings before, but I’ve never actually made the filling or the dough, so this was great. The instructions on folding them were also awesome, better than I could explain to my mom when she was helping me out.
June 3rd, 2012 at 7:21 am
[…] le façonnage des raviolis pot stickers, je vous propose d’aller voir le pas à pas de ce site ou de consulter cette vidéo ou […]
July 22nd, 2012 at 12:08 am
[…] from a food blogger who has a detailed description with great photos to go with her recipe – Chinese Dumplings And Potstickers Recipe Share this:PinterestTwitterFacebookTumblrRedditPrintEmailLike this:LikeBe the first to like this. […]
August 4th, 2012 at 9:13 am
I often make my Thai won tons and pot stickers and friends say how do you fold them? Your photographs and instructions are the best I have ever seen! Now I can refer friends to your instructions and photos.
I do make my filling a bit different shrimp, pork, etc but they are Thai version. One of the cooking classes my late husband and I did with our grand-kids was pot stickers, another was the Lotus leaf wrapped sticky rice with 7 treasures, and another was the fresh salad rolls. They are 12 & 15 and I will continue their cooking lessons. This way when they get to college they won’t starve and they will have many friends :-)
August 6th, 2012 at 12:20 pm
[…] bottoms and then poured water over, lid on, and steamed them for five minutes or so. I used much of this […]
August 14th, 2012 at 11:00 pm
I am definitely a beginner and the pictures are soooo helpful- I have used so many recipes of this site- thanks so much for sharing your wonderful photos and food with us :)
September 7th, 2012 at 6:46 pm
[…] the veggie dumplings, we combined this recipe and this recipe, just chopping up veggies as they suited us. The spicy soy dipping sauce in that second link is […]
September 14th, 2012 at 3:45 pm
[…] million thanks to Use Real Butter’s blog post for the dough recipe and helpful step by step. If these pot stickers are this good using food […]
September 18th, 2012 at 11:24 pm
[…] refer to this website as […]
October 6th, 2012 at 9:35 pm
This is such a great post – can’t wait to make them – thank you so much !! :)
October 15th, 2012 at 10:12 am
[…] the outside rim of the skin and fold it, making pleats along each side. (Use Real Butter has a great step-by-step tutorial of the folding process.) Pinch it well to seal, and set aside. […]
November 14th, 2012 at 6:27 am
[…] and sesame flavors.Chinese Pork PotstickersAuthor/Source: Abbi @ Onceamonthmom.com, adapted from Use Real Butter. Ingredients: 16 ounces ground pork 0.5 cup cabbage, finely shredded4 cups mushrooms, minced0.5 […]
November 28th, 2012 at 9:52 pm
Hi,
I love this recipe! thanks for posting it. i’ve made this recipe many times (w some alterations). it’s very time consuming, but so worth it. I love your images also. keep up the good work!
December 3rd, 2012 at 7:14 pm
Hi! This recipe looks delicious and I want to try them! My boyfriend, however, is horribly allergic to mushrooms. Is there an alternative you would recommend for the mushrooms in the filling recipe?
Thanks!
–Lisa
December 3rd, 2012 at 8:58 pm
Lisa – you can omit the mushrooms altogether, or sub in finely chopped tofu (probably dried tofu or perhaps firm tofu that has been drained). Or just try the shrimp version which has no mushrooms. Hope you like it!
December 9th, 2012 at 12:38 am
[…] Tapas, Tournedos Rossini, oder gemeinsam mit Freunden zubereitetet jiao zi, Chinesische Potstickers nach diesem Rezept von Use Real Butter (sehr zu […]
January 6th, 2013 at 11:54 am
These recipes have convinced me that of all the many cooking traditions with a standalone goodies-wrapped-in-dough dish, the Chinese tradition is easily at the top. Incredible.
It may be worth mentioning that I got a *perfect* release from a thick-bottomed stainless steel pan. I was generous with the oil but not overly so, cooking with the expectation that these would anneal themselves to the bottom of my pan. (They didn’t! Huzzah!) I think there were like 2 tiny little browned spots that washed off with zero effort.
Also, thanks for the pictures showing how to close the dumplings… very helpful. Your recipes are written like lab protocols, and I love it. Thanks for sharing!
January 20th, 2013 at 7:53 pm
Hi! I’ve made this recipe with pork once before and it was delicious! However, it made waaaay too many for me. So, if I half the filling recipe, will it make about 20 potstickers? Thanks for the recipe!
January 20th, 2013 at 8:00 pm
Nora – well, that kinda depends on what size you make them, but I think it’s safe to assume that if you halve the recipe, you will make half the quantity that you made before. Good luck!
January 21st, 2013 at 11:45 am
Hi!
Thank you so much for this recipe! I’ve never made dumplings but have always wanted to try. How can I get the dough to be thin enough for each dumpling without it ripping? Last time I used a simply four and water dough, everytime I tried to pinch the dough ur would rip :(
January 24th, 2013 at 9:40 pm
Annisa – The dough is pretty stretchy, but I’d say not to go thinner than 1/16th of an inch in thickness. Try that. It will also depend on how wet or dry the dough is. If it’s dry, it will tear, if it’s wet, it will stick to everything. Good luck!!
January 26th, 2013 at 11:38 am
[…] adapted from userealbutter.com Share […]
January 28th, 2013 at 12:27 am
Thank you ill try it! :))
January 31st, 2013 at 5:24 am
Beautiful/helpful post, thanks! Couldn’t read through all the comments to check if anyone else mentioned this… but the way my dad taught me to cook potstickers/guo tie was to first pour some oil to coat the bottom of the non-stick pan, line up the potstickers (we did it with some store-bought frozen ones from Costco) in rows in the pan (kinda rubbing the flat bottoms in the oil to make sure each bottom is fully covered in oil), then turn on the heat and fill the pan with water so it covers about 2/3 high of the potstickers. This way there is no oil spattering at all. Then cover, let come to a boil and cook, and they are done once all the water has been absorbed/evaporated and the potstickers have had some time to brown on the bottom, at the end. Seems like the lazy/easier way to do it and we always ended up with potstickers that were all cooked through and nicely browned on the bottom! :)
February 15th, 2013 at 4:18 pm
[…] I found this amazing recipe for pork potstickers a few months ago and I love it, check it out at Use Real Butter. Her recipe(s) are easy to follow and she provides pictures along the way. My only problem with […]
March 2nd, 2013 at 1:49 pm
OMG….I am having lunch on this recipe. Is awesome!!!!!! I made the dough round i cut them with a glass.
thanks tons!!!!
April 16th, 2013 at 10:10 am
[…] This next part I still need to perfect. It’s difficult to describe, and I recommend checking out this blog to see step by step photos on how to cut and fold the dumplings: http://userealbutter.com/2007/10/04/chinese-dumplings-and-potstickers-recipe/ […]
April 30th, 2013 at 7:30 pm
[…] honestly the tutorial we followed over at Use Real Butter is phenomenal. Go read it and see the pinch and fold in […]
June 2nd, 2013 at 6:12 pm
[…] filling in the middle, then crimp the wet half closed (if you’ve never made dumplings before this tutorial may help! I only fold mine once as I’m […]
June 19th, 2013 at 7:14 pm
Have you tried this with bok choy? I have some ready to harvest from my garden and am looking for recipes to try them with.
July 8th, 2013 at 9:43 am
SJ – I have not, but I’m sure you could! The recipe is quite flexible.
July 12th, 2013 at 12:19 am
Jen,
Thank you for this blog and for all the passion you put into it. I made this recipe last night for the second time, and again it was a big hit. I had a preponderance of vegetarians at the table so I did one batch with pork and one with mushrooms and paneer (I live in India, so vegetarians and paneer are both plentiful).
I love dumplings in any form, and lately Georgian dumplings have been my go-to (they are remarkably similar to soup dumplings). I think Saveur’s recipe is very good, although I make the following modifications:
-cut out the fenugreek, halve the cilantro, add caraway seeds
-mix 1/2 cup of beef or vegetable stock into the meat filling
http://www.saveur.com/article/recipes/georgian-dumplings
Give it a try some time!
July 16th, 2013 at 12:55 pm
Omg…these are wonderful. They are easy to make and taste great. If you can read and chop foods you can make this simple delicious dish. I used wonton wraps from giant. For the sauce I used another recipie which is also delicious. 1 cup raw sugar, 1 1/2 cups water, 1/2 cup white vinegar, 4 minced garlic cloves, 2 tsp salt, 4 tbsp soy sauce, 2 tbsp rice vinegar…combine all in a sauce pan, bring to a boil, then simmer 10 to 15 minutes stirring occasionally until syrupy.cool slightly and enjoy. So yummy. Don’t pass this wonton recipie up. You gotta try this.
July 23rd, 2013 at 9:09 am
I have been using this recipe for almost the past 3 years. The funny thing is I am not a fan of dumplings. For some reason they make me feel sick and bloated and blaaah. BUT MY FIANCEE AND HIS FRIENDS ON THE OTHER HAND… I’ll whip of close to 70 dumplings and they will be gone by the end of night! They looove this recipe so much and I figured for how long i’ve been using it and how often I make them, I should thank you for this great and easy recipe!
August 8th, 2013 at 10:19 pm
[…] Handmade Chinese Dumpling Recipe for Dummies […]
August 15th, 2013 at 5:17 pm
I LOVE the fact that you put the recipe and step-by-step photos of the dough!! I know they’re labor intensive, but they’re SO GOOD! Thanks, I’ll definitely be trying these!
November 3rd, 2013 at 3:27 pm
[…] very intimidating with all of the requisite rolling, filling, folding, and pleating. I came across this recipe online months ago and relegated it to waiting in my Pinterest food board. I finally found the […]
December 6th, 2013 at 2:53 pm
[…] the filling. Again, this is another part that varies greatly between recipes. After looking at several of them, I settled on about 2 inches of minced ginger (I’d increase this in the future), a […]
December 27th, 2013 at 8:25 am
[…] a base recipe, I decided to follow Use Real Butter‘s dumpling recipe here. I replaced the bamboo with an equivalent volume of diced garlic chives that I happened to have […]
January 7th, 2014 at 7:23 pm
[…] Real Butter: Chinese Dumplings & Potstickers […]
March 1st, 2014 at 7:37 pm
[…] did find the time this week to experiment with using won ton wrappers to make dumplings. Generally I’ve been making the dough myself, but all that rolling is very time-consuming. […]
April 29th, 2014 at 4:04 am
[…] Wrappers Guidance from Use Real Butter, makes enough for about 100 small […]
June 3rd, 2014 at 9:41 am
[…] Abbi @ onceamonthmeals.com, adapted from Use Real Butter. […]
June 22nd, 2014 at 11:06 am
I finally got brave enough to attempt this yesterday to go with the pan-seared sichuan shrimp with glass noodles (yes, I spend ALL day in my tiny kitchen). I’m not as adapt with a knife, so to mince EVERYTHING it took me about 2 hours (I know, I know… I’m sooo slow! lol). I was most nervous about making the wrappers. I don’t have dough blades for my food processor, so I had to try the traditional method of making the dough. I followed the recipe, and I’m more adapt at baking than cooking, so I thought the dough would turn out fine, but for some reason, the dough seemed a bit “off” from what it was suppose to be, perhaps if I had dough blades, it would have turned out better.
Rolling the dough with a full size rolling pin in my tiny area proved to be impossible. I got creative and washed and used a La Croix Cerise Limon can (since they are skinny and just the right length). It actually worked great! The hardest part was all the pleating each dumpling required. I looked at the pictures a bunch of times, but I think just need to showed in person so someone can correct me… I did what someone else suggest and just pressed the wrapped together all around. Not nearly as pretty, but functional. My boyfriend saw this, and told me his mom actually taught him how to pleat them when he was a kid (He’s from Taiwan)! So I rolled out the wrappers, and he filled and formed them! They didn’t turn out as pretty as yours, but they worked for us!
I decided to steam them, and when I served them, we both agreed that the filling was quite tasty, but that the dough was off. Either I made the dough wrong or the I rolled the wrappers a little too thick and the wrapper to filling ratio was off, we weren’t sure. We decided next time to try the premade wrappers that you can get at Asian grocery stores.
So you’re recipe is great, I just didn’t have quite the skill to execute it. Perhaps when I make more dough today for the rest of filling, it will turn out better. Maybe I just need practice. The area I can work with my kitchen is very small, so maybe next time it will just be easier in general to by the premade wrappers. Whatever the case I haven’t given up on these. I know that if I can master these that my boyfriend and his family will be proud!
August 23rd, 2014 at 6:21 pm
Thank you for the pictures! I just had the most wonderful experience learning to make Chinese Dumplings on a commercial crab boat in Hoonah, Alaska. My teacher was/is amazing and I took notes and pictures. Our language barrier is large. She is from China and I am Alaskan:)
The information and pictures you provided will help me re-create amazing dumplings back in Juneau, Alaska. My notes are good but your pictures and details are perfect. Fresh salmon, crab and halibut are great additions to the PORK!
December 6th, 2014 at 8:14 pm
Thanks for this recipe!! I made dumplings today just for kicks and giggles just to see if I could. I added a little rice vinegar, garlic and white pepper- which I found in another recipe- but otherwise used this to a tee. SO YUMMY! It took me all afternoon but since I wanted a day in the kitchen that was perfect. And the result was so worth it!!! My husband and I LOVED these. I’m going to make more dough tomorrow so I can finish off the extra filling- freeze it and make the perfect snack. I’m not even too horrible at folding. I appreciate you sharing your culture and recipes. Thanks again for the tutorial, a wonderful afternoon, helping me do something I didn’t know I could do (and am so tickled I accomplished), and MOST IMPORTANTLY such a tasty snack!
January 15th, 2015 at 5:24 am
Hello,
Thanks to all the pictures and really clear explanations, I prepared pork dumpling yesterday which I steamed: my son really enjoyed them and asked for more. The recipe has been printed and stored in my recipe book for future regular uses. Thanks a lot for recipes and incredibly beautiful pictures of Boulder and Crested Butte.
Anne
January 27th, 2015 at 2:58 pm
[…] found a recipe online, and it blew me away. First of all, that delicious, soft sticky dough? I thought for sure it must […]
February 16th, 2015 at 7:36 am
[…] from a few to create my own chicken filling. I then used this really helpful post from userealbutter.com to make the dough and for cooking guidance. If you are planning on having a go at making these […]
March 18th, 2015 at 8:49 pm
[…] Jen’s post on how to fill and shape the dumplings. I wet the edge of the round with a bit of water to get the edges to stick if the pleating […]
March 30th, 2015 at 10:50 pm
Hi! Quick question, what type of food processor do you have? I want to buy a one that works, but still cheap (<$50), but if that is unrealistic I don't mind saving up to buy one. Great recipe, I can't wait! Thanks :)
March 30th, 2015 at 10:51 pm
Sofia – I have a cuisinart and sadly, they aren’t cheap. But you can make the dough without a food processor. My mom mixes it by hand. Good luck!
April 5th, 2015 at 6:41 pm
Hello there. I love dumplings and pot stickers. I was wondering, instead of pork, could we sub chicken or beef? We are not big pork eaters, But I will make them anyway.
Thank you for posting your recipe.
April 5th, 2015 at 8:10 pm
Jennifer – Yes! You can sub chicken, beef, turkey, tofu, vegetables, whatever. Certain vegetables seem to go well with certain meats, so I’d do a quick search on the interwebs for other people’s combinations. I’m pretty sure Jaden (Steamy Kitchen) or Bee (Rasa Malaysia) have excellent variations on the fillings. Enjoy!
April 20th, 2015 at 5:04 pm
[…] Traditional Pork-Ginger Dumplings (adapted from http://userealbutter.com/2007/10/04/chinese-dumplings-and-potstickers-recipe/) […]
April 21st, 2015 at 4:39 am
[…] relativ frei erfundenen hirntascherln als einlage: nach gyoza-art (rezept für die dumpling skins hier, runterscrollen!, link via frau esskultur). gefüllt hab ich mit kalbshirn und einem stückerl […]
May 19th, 2015 at 6:34 am
[…] in the center of each wrapper and fold the dough in half, pleating the edges along one side (see images in post for how to fold pleats). Keep all unused dough under damp […]
June 17th, 2015 at 8:25 am
[…] many of the proportions. I combined that filling with some helpful wrapper tips from the food blog Use Real Butter , and this veggie dumpling recipe was […]
October 7th, 2015 at 8:47 pm
[…] habit. Naturally, I took to the Internet to find a recipe on my quest to make some dumplings. Here is the recipe I used (and still use) for shrimp and pork dumplings, and it has great pictures of everything. The […]
October 10th, 2015 at 5:07 am
Absolutely love this recipe! Made it twice already and about to make it again :) I hope you don’t mind, im posting the link to this on my blog. It’s so great, everyone needs to make these!
GG x
October 10th, 2015 at 6:02 am
Wonderful post! Thank you. Give the canine asst a pat!
October 10th, 2015 at 12:11 pm
[…] use this recipe, and have done many times. You can play about with it a bit and it never fails. (I’ve only […]
October 20th, 2015 at 9:21 pm
[…] dumplings, I use store-bought wrappers, and I definitely use a food processor to save time. Here is the recipe I used then, and still use […]
January 8th, 2016 at 2:24 pm
[…] Use Real Butter’s Potstickers Recipe Link […]
February 15th, 2016 at 8:39 am
I’ve made the shrimp filling with my boyfriend the past 2 years for Valentine’s day and the filling tastes amazing (I substitute out the pork for turkey thighs) and I find chopping by hand to be quite soothing. I did make the dough from scratch which was fun last year, but I did decide to wimp out this year and pick up some pre-made wrappers from the asian store.
May 1st, 2016 at 8:09 am
Hello, I read your dumpling recipe & I want to try to cook. Do you have a Shumai recipe too? I would like to try that too.
Thanks!
Delaila
May 2nd, 2016 at 1:01 am
Delaila – I don’t have one, but my friend Marc has a beautiful recipe on his blog: http://norecipes.com/recipe/shumai-recipe
May 11th, 2016 at 2:53 pm
I love your recipes and photos! What’s your ratio of scallions to ginger? Is it approximately twice the scallions to ginger when all is said and done? I don’t mind “gingery” potstickers. Thanks in advance. Well since I’m doing it right now, I guess I will just wing it and see!
May 11th, 2016 at 2:56 pm
Wendy – I’d say 2:1 if you like ginger or 3:1 if you don’t want the ginger to be as pronounced. Good luck!
May 23rd, 2016 at 2:14 pm
Jen, I just came back to say with the scallions and ginger, that I used somewhere between 3:1 and 2:1 and it worked out great. I wanted to freeze some for dinners this month but we pretty much finished everything in the first three nights. Thanks so much!
January 3rd, 2017 at 5:45 pm
[…] ingredients for making my own gyoza and finally got around to making them recently. I started with this recipe from Use Real Butter, which I suppose is technically chinese potsticker […]
February 26th, 2017 at 6:24 pm
Hi Ms. Yu. I was so glad to see this recipe! Dumplings/potstickers are one of my favorite foods of all, definitely my favorite Asian food. I live in a very rural area and there is no Chinese restaurant within a 45-minute drive, much less delivery and I always thought that homemade ANYTHING (If done well.) is better. Growing up in a rural town, while not actually ON the farm, I learned to appreciate homegrown foods and farm-to-table long before it was popular. Needless to say, seeing a completely homemade recipe for dumplings excited me a lot more than it should have excited a sane person. I tried to read all the comments, but I can’t finish (popular recipe) and I need to ask this. I will have to freeze some of these as I can’t possibly eat them all myself and my daughter is REALLY picky.(So, I don’t know if I can even get her to try one.) I have a Foodsaver vacuum storage unit but wonder how you’d suggest executing this. Should they be frozen raw or precooked? (Maybe lightly steaming before freezing and then thawing and pan frying?) I don’t know if you’ve ever had any you’ve frozen but I was wondering.
Oh and, if you think your Mom and Grandma’s list of things you must eat on New Year’s to avoid catastrophe is harrowing, you should hear my Southern grandma’s list. You’ve made me appreciate my Grandma all the more. She will be 95 this year and still makes some of the best fried chicken and biscuits I have ever eaten.
Again, thanks!
February 26th, 2017 at 6:33 pm
Angela – Hi there! You can totally freeze the dumplings to cook later (and in smaller batches) as you please :) I find it easiest to layer them on a lined baking sheet (use wax paper or parchment paper) when they are uncooked. Just gently rub the base in a little flour (to prevent sticking) and set it on the baking sheet. Try not to let them touch each other as they might stick and never come apart without tearing each other open. Pop them in the freezer and when they are firm and no longer sticky (about 30 minutes), you can carefully store them in a ziploc bag or a food saver if you have one. Avoid packing them in tightly just in case they stick together – we only want them to stick to the pot! ;) Good luck and treasure your grandma. I miss mine so very much xoxo
October 12th, 2017 at 9:34 pm
Hi, I have loved this recipe and the photos of every recipe that I steal off of your site. I made some recently, doubled the batch, but had to leave filling for a couple of days in the fridge. The flavor of freshly made ones just wasn’t there. Would the vegetables have made the filling watery? They turned out bland and I can’t figure out why. Help.
October 12th, 2017 at 9:46 pm
Tim – I’m not sure if the vegetables make it watery so much as they lose their freshness or perhaps soak up the pork juice? I have used leftover filling for other things before and you’re right, it isn’t the same as freshly made, but mine weren’t bland per se. I think if you have to make the filling ahead of time, prep all the veg and store in an airtight container, then mix with the pork (and shrimp) and soy sauce, etc. right before using. I hope that helps?
February 27th, 2018 at 11:46 am
I’ve made these twice. They were great each time. How would you suggest reheating them? Thank you!
February 27th, 2018 at 12:25 pm
Joy – So glad they worked out for you! When we are lazy, we place the potstickers in a bowl, cover with a plate, and microwave for a minute or two. But they are a little “soggy’ that way. The best way to reheat them is to lightly grease a skillet (non-stick, stainless steel, whatever) over medium heat and reheat the potstickers in the pan (start out covered so the tops heat up, then remove the cover and let the base crisp).
April 29th, 2018 at 9:14 pm
I used this recipe years ago and happily made hundreds of dumplings over a couple of months with various mods on the filling. Laying out all the steps as you did made it easy to learn.
Then I got busy/interested in other things (short attention span) and forgot about them. Two weeks ago I got a grinder attachment for my kitchenaid mixer and I’ve been grinding anything that sits still long enough (my cat won’t come in the kitchen anymore for some reason).
Yesterday I was grinding some pork I was planning to freeze and I thought of these potsickers. Long story short I pigged out on them and still have 182 of them in the freezer for future and giving away.
Still just as good! Thanks for the step by step.
February 2nd, 2019 at 10:51 am
Hi I just found this recipe and I cannot wait to try.
While reading some comments one mentioned covering dough for 15 minutes with a damp cloth.
But the recipe I read did not indicate where to do this step.
I am assuming the dough should be covered before and sit before cutting into strips but wanted to confirm.
Leslie
February 2nd, 2019 at 11:00 am
Leslie – In the section “Both Dough Methods:” the first sentence says to knead the dough and cover with a damp towel. Hope it works out!
March 16th, 2020 at 2:14 pm
Hi again, I was curious and I’m sorry if you’ve answered this before, there are so many comments on this I got lost. My local restaurant has this wonderful silky thin kind of wrapper on their dumplings. Are those the egg wrappers? Sometimes I feel my dough turns out a little heavier and thick. Thanks in advance for any suggestions. Love the site!!
April 12th, 2020 at 7:41 am
Tim – Hi! Sorry for the delay in reply. I didn’t know the answer and had to look around at other recipes. There are egg dough wrappers for things like wontons that can be pretty tender. You can also stick with the flour and water dough, but use boiling water for a delicate wrapper texture. But if you are seeking the texture of what your local restaurant achieves, perhaps ask them? It’s possible they purchase their wrappers, but if they make them from scratch, they might be willing to share their secret with you. Good luck! :)
January 28th, 2021 at 8:40 pm
Just polished off a plate of your potstickers which had been in the freezer. You were the first food blog I ever read, and this is a go to recipe for us. They are so amazinging!!
February 4th, 2021 at 9:17 am
Jennifer – So happy you’re still loving the potstickers! xoxo